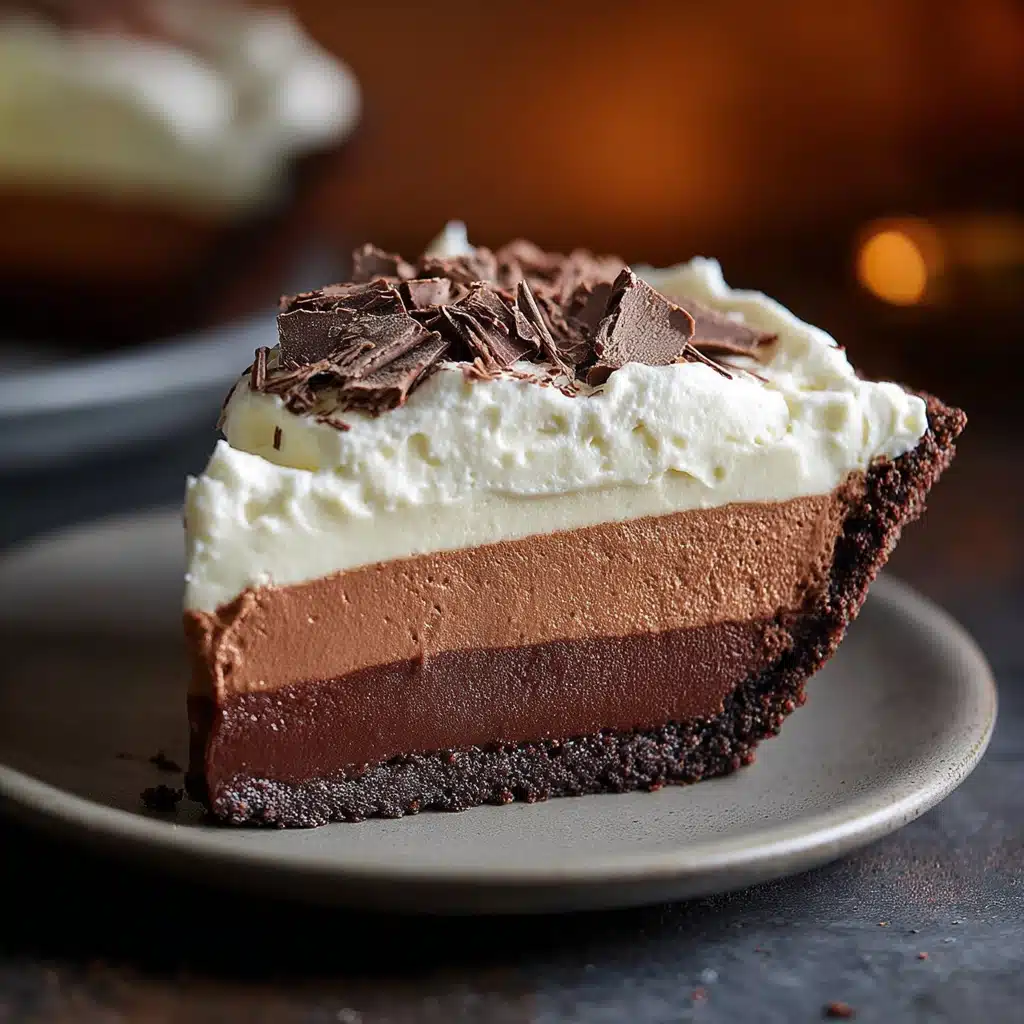
No-Bake Chocolate Cream Pie Recipe
If you’re looking for a truly decadent dessert that’s as easy to pull together as it is luxurious, you’ll fall in love with this No-Bake Chocolate Cream Pie. Imagine a smooth, glossy layer of rich chocolate ganache nestled in a buttery Oreo crust, finished with a cloud of fresh whipped cream. The best part? There’s no oven required, which means this pie is ready to shine in any season. Whether you’re serving it at a dinner party or just because, this recipe is sure to turn an ordinary day into a delicious occasion.
Ingredients You’ll Need
You only need a handful of simple, classic ingredients for this pie, but each one plays a starring role. The deep chocolate of the crust and filling, the creamy lusciousness of the whipped cream—every component works together to create the unforgettable experience of No-Bake Chocolate Cream Pie.
- Oreo cookies: These classic cookies provide a crunchy, chocolatey foundation for the crust—no baking required!
- Unsalted butter (for crust): Melted butter acts as the glue, binding those Oreo crumbs into a perfectly sliceable base.
- Semi-sweet chocolate: The heart of your ganache; use good quality chocolate for the smoothest, richest filling.
- Heavy cream (for ganache): Adds creaminess to the ganache, balancing the intensity of the chocolate.
- Unsalted butter (for ganache): Softens the ganache and adds a silky sheen and extra flavor depth.
- Heavy cream (for topping): Whips up light and airy, making the ultimate topping for the rich pie.
- Confectioners’ sugar: Sifted in for a subtly sweet, stabilized whipped cream topping.
How to Make No-Bake Chocolate Cream Pie
Step 1: Prepare the Oreo Cookie Crust
Start by crushing a package of Oreo cookies into fine crumbs—it’s easiest in a food processor, but a zip-top bag and rolling pin does the trick, too! Combine the crumbs with melted unsalted butter in a big bowl, stirring until every crumb is moistened. Press this mixture firmly into the bottom and up the sides of a 9-inch pie plate. The tighter you pack it, the cleaner your crust slices later. Slide it into the freezer and let it chill for 30 minutes so it sets up perfectly and holds together once filled.
Step 2: Make the Chocolate Ganache Filling
Finely chop your semi-sweet chocolate and place it in a large, heatproof bowl. Meanwhile, heat your heavy cream in a saucepan just until it starts to gently simmer—don’t let it boil! Immediately pour the hot cream over the chocolate and let it sit undisturbed for a minute so the chocolate begins to melt. Now, grab a whisk and slowly, gently stir until the mixture is completely smooth and glossy, about two minutes—watch the ganache transform! Add cubed, room-temperature butter next, stirring until melted. This gives your filling a dreamy texture and rich taste. Set the ganache aside to cool a bit, but not so long that it hardens.
Step 3: Whip the Cream Topping
With a stand mixer or hand mixer, beat the remaining heavy cream and sifted confectioners’ sugar together. Start on low and gradually increase the speed, whipping until soft peaks form—the cream should still look pillowy and smooth. This fresh topping balances the deep chocolate flavors and adds airy contrast in every bite.
Step 4: Assemble and Chill
Retrieve the Oreo crust from the freezer and gently pour in the slightly cooled chocolate ganache, filling the crust about 90 percent full. Give the pie a gentle shake or tap to even out the filling. Now, cover it and let it chill in your refrigerator for at least two hours so the chocolate firms up. Patience is key here—the wait is absolutely worth it.
Step 5: Add the Finishing Touches
When you’re ready to serve, spoon or pipe the fresh whipped cream in the center of your No-Bake Chocolate Cream Pie. For a fancy finish, sprinkle with chocolate shavings, mini chips, or even colorful sprinkles. Slice and serve up the dreamiest chocolate pie, no oven mitts required!
How to Serve No-Bake Chocolate Cream Pie

Garnishes
A flourish of toppings can make your No-Bake Chocolate Cream Pie truly stand out. Classic chocolate shavings, a dusting of cocoa powder, or a sprinkle of mini chocolate chips are always welcome. For color, add a few fresh berries or even some edible gold stars if you want to make it celebration-ready!
Side Dishes
While this creamy pie is a star on its own, it pairs beautifully with bold, fresh flavors. A bowl of tart raspberries, a scoop of vanilla bean ice cream, or a fresh mint sprig on the plate can elevate each bite and cut through the richness for the perfect balance.
Creative Ways to Present
Don’t be afraid to get a little whimsical! Make individual No-Bake Chocolate Cream Pie minis using mason jars or ramekins for an adorable, portable treat. Or, layer crushed Oreos, ganache, and whipped cream into dessert glasses for an easy, elegant parfait presentation. Even a drizzle of salted caramel or raspberry sauce can add a gourmet touch.
Make Ahead and Storage
Storing Leftovers
If you’re lucky enough to have leftovers, simply cover the pie loosely with plastic wrap or foil and store it in the refrigerator. It keeps beautifully for up to three days, and the flavors deepen over time, making each chilled slice just as delightful as the first.
Freezing
Yes, you can freeze No-Bake Chocolate Cream Pie! Wrap it tightly (without the whipped cream topping) and freeze for up to one month. When ready to enjoy, thaw in the refrigerator overnight, then finish off with fresh whipped cream right before serving for best texture.
Reheating
No reheating required—this pie is all about that cool, creamy texture! If frozen, let the pie thaw in the fridge until it’s soft enough to slice, then serve chilled, exactly as intended.
FAQs
Can I use milk chocolate instead of semi-sweet chocolate?
Absolutely! While semi-sweet chocolate provides a deep, bold flavor, milk chocolate can be substituted for a slightly sweeter, creamier No-Bake Chocolate Cream Pie. Just be aware that the sweetness level will rise, so you may want to adjust the whipped cream slightly.
What’s the best way to crush Oreo cookies for the crust?
A food processor is the easiest and quickest way to get uniform crumbs, but you can also place the cookies in a large zip-top bag and crush them with a rolling pin. Just make sure the crumbs are fine so the crust holds together nicely.
Can I make No-Bake Chocolate Cream Pie ahead of time?
Yes! This pie is perfect for making ahead. You can prep the entire pie (without whipped cream) up to two days in advance, then simply whip and spread the cream topping right before serving for best results.
How do I make chocolate shavings for garnish?
Take a bar of your favorite chocolate and run a vegetable peeler along the edge to create delicate shavings. Sprinkle them over your No-Bake Chocolate Cream Pie just before serving for a sweet, professional finish.
Can I use a different cookie for the crust?
Certainly! While Oreos are a classic favorite, you can switch things up with chocolate graham crackers, Biscoff cookies, or even chocolate wafer cookies. The process stays the same, so feel free to experiment with your favorite flavors.
Final Thoughts
If you’re craving a showstopping dessert that’s easier than it looks, this No-Bake Chocolate Cream Pie is sure to become a cherished favorite. Don’t wait for a special occasion—give this recipe a try and savor every silky, chocolatey bite!
PrintNo-Bake Chocolate Cream Pie Recipe
Indulge in the decadent delight of this No-Bake Chocolate Cream Pie that features a rich Oreo cookie crust, velvety chocolate ganache filling, and a fluffy whipped cream topping. This easy-to-make dessert is sure to impress your guests!
- Prep Time: 20 minutes
- Cook Time: 10 minutes
- Total Time: 2 hours 30 minutes
- Yield: 1 9-inch pie 1x
- Category: Dessert
- Method: No-Bake
- Cuisine: American
- Diet: Vegetarian
Ingredients
Oreo Cookie Crust:
- 1 package Oreo cookies, crushed into crumbs
- 8 tablespoons unsalted butter, melted
Chocolate Ganache Filling:
- 16 ounces semi-sweet chocolate, finely chopped
- 2 ¼ cups heavy cream
- ½ cup (1 stick) unsalted butter, at room temperature, cut into cubes
Whipped Cream Topping:
- 1 ½ cups heavy cream
- ¼ cup confectioners’ sugar, sifted
Instructions
- Oreo Cookie Crust: In a large mixing bowl, combine the Oreo cookie crumbs and melted butter. Stir until well mixed. Press the mixture into a 9-inch pie plate, ensuring it covers the bottom and sides evenly. Place the crust in the freezer for 30 minutes to set.
- Chocolate Ganache Filling: Place the chopped chocolate into a large heatproof bowl and set it aside. In a small saucepan over medium heat, bring the heavy cream to a low simmer, then remove it from the heat. Pour the warm cream over the chopped chocolate and let it sit for 1 minute. Whisk the chocolate and cream together until smooth and glossy, about 2 minutes. Stir in the cubed butter until completely melted and incorporated. Set the ganache aside to cool slightly.
- Whipped Cream Topping: Using a handheld mixer or stand mixer, beat the heavy cream and sifted confectioners’ sugar until soft peaks form.
- Assembly: Remove the Oreo crust from the freezer and pour the chocolate ganache into the crust. Fill the crust to about 90% full. Place the pie in the refrigerator and let it set for about 2 hours, or until the ganache is firm. Once ready to serve, dollop the whipped cream in the center of the pie. Optionally, garnish with chocolate shavings or sprinkles. Slice and serve immediately!
Nutrition
- Serving Size: 1 slice
- Calories: 480
- Sugar: 23g
- Sodium: 160mg
- Fat: 36g
- Saturated Fat: 22g
- Unsaturated Fat: 10g
- Trans Fat: 0g
- Carbohydrates: 40g
- Fiber: 3g
- Protein: 4g
- Cholesterol: 70mg
Keywords: No-Bake Chocolate Cream Pie, Chocolate Ganache Pie, Whipped Cream Pie, Dessert Recipe

