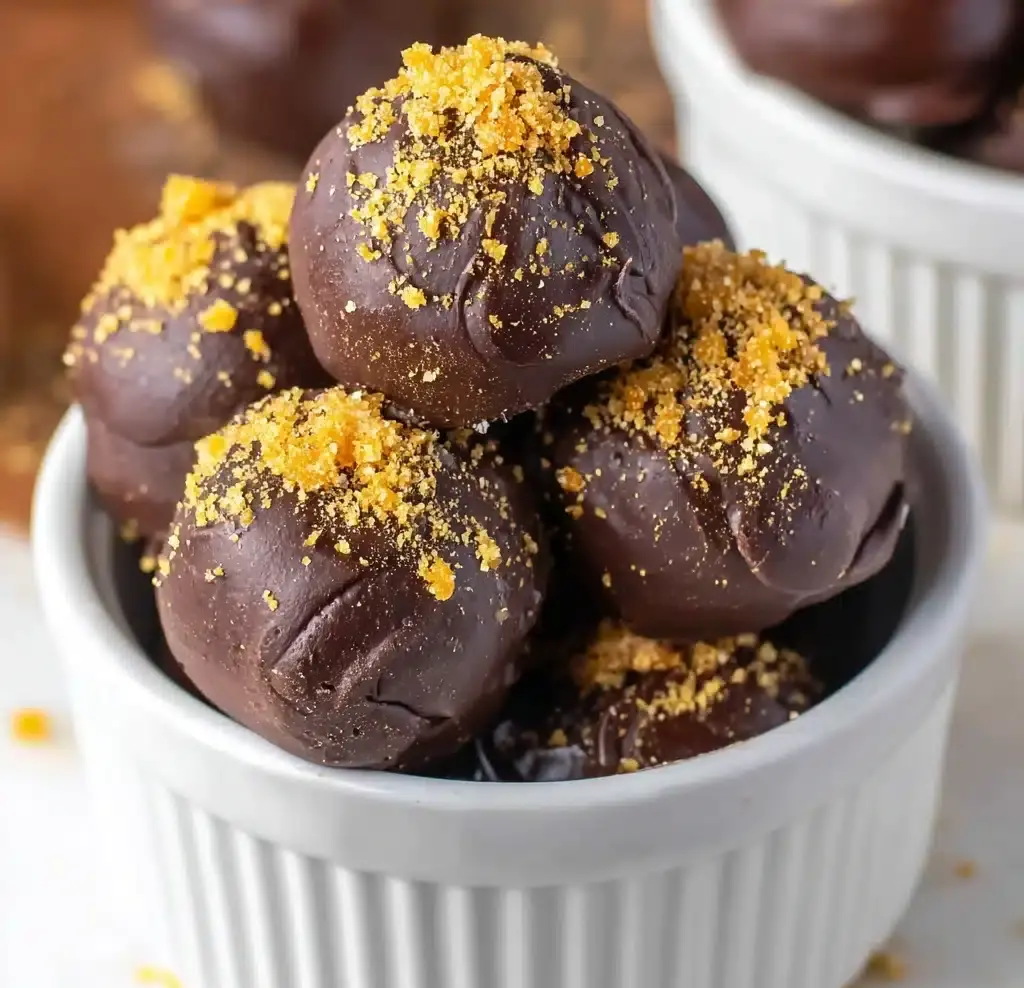
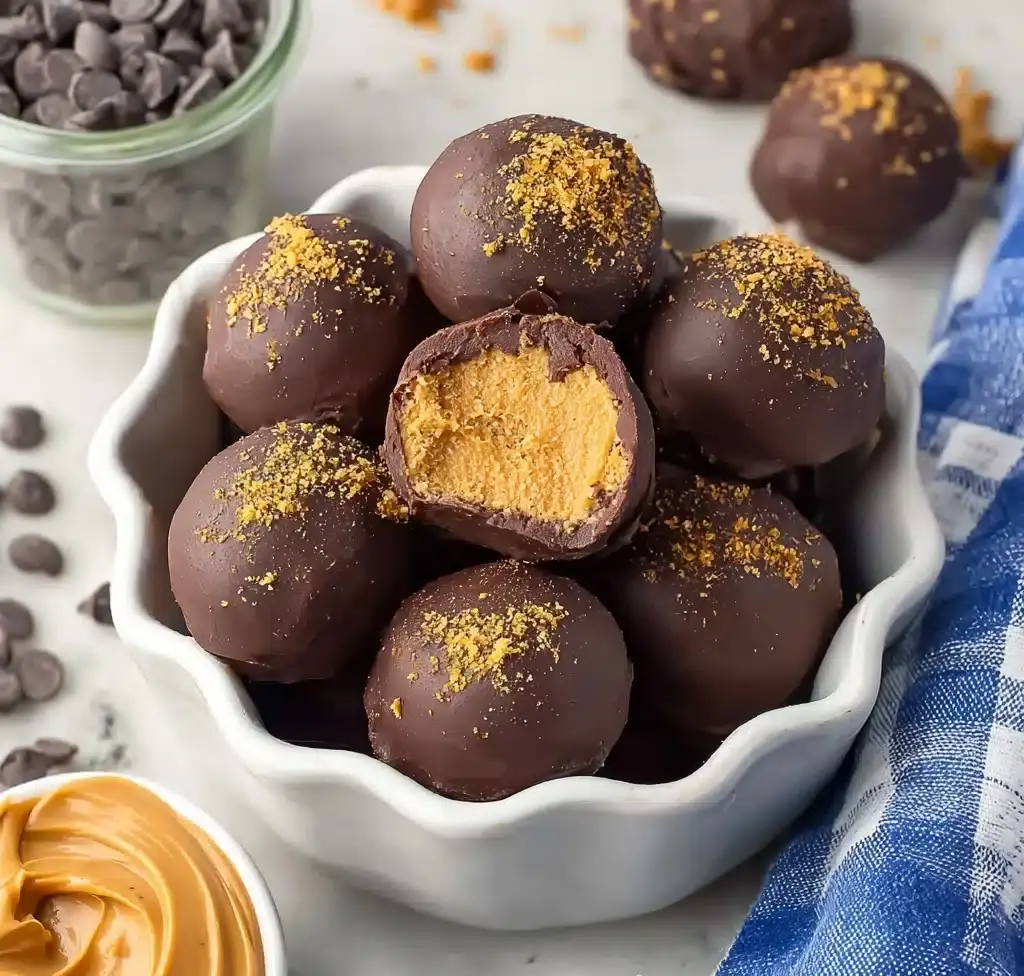
Butterfinger Balls Recipe
If you’re on the hunt for a no-bake treat that wows at any occasion, look no further—Butterfinger Balls are pure peanut-buttery bliss wrapped in a rich chocolate shell! Every bite delivers a perfect blend of creamy, crunchy, sweet, and salty flavors thanks to classic favorites like peanut butter, chocolate chips, and those irresistible crushed Butterfinger bars. Their simple ingredients and easy steps belie just how impressive (and honestly, addictive) these homemade candy balls can be. Whether you’re planning a holiday platter, need a school bake-sale showstopper, or want a quick sweet fix, Butterfinger Balls absolutely deserve a spot in your dessert rotation.
Ingredients You’ll Need
The beauty of Butterfinger Balls lies in how a handful of pantry staples magically transform into a decadent treat. Each ingredient brings its own charm—so pay attention to the details below, because these selections ensure just the right texture and flavor in every bite.
- Peanut Butter: Creamy peanut butter acts as the delicious base, delivering rich flavor and smooth texture—avoid using natural peanut butter for better binding.
- Butter (softened): Softened butter adds a silky richness and helps everything blend together perfectly—room temperature is key!
- Vanilla Extract: Just half a teaspoon rounds out the flavors and gives a subtle warmth—don’t skip it.
- Powdered Sugar: This sweetens and firms up the mixture for easy rolling—add gradually to get the right consistency.
- Crushed Butterfinger Bars: These bring unmistakable Butterfinger crunch, nougat flavor, and that signature golden color—reserve a bit for an eye-catching topping!
- Chocolate Chips (semi-sweet): Melting these creates a decadent coating—the semi-sweet kind balances out the sweetness beautifully.
- Coconut Oil or Vegetable Oil: Just a splash makes your melted chocolate perfectly glossy and smooth for dipping.
How to Make Butterfinger Balls
Step 1: Cream the Base
Start by beating the peanut butter, softened butter, and vanilla together on medium speed. Let your mixer run until the mixture is super creamy and slightly fluffy—this is the foundation that will bind your Butterfinger Balls together and keep them melt-in-your-mouth tender (not dry or crumbly).
Step 2: Add Powdered Sugar
Gradually beat in the powdered sugar, about half a cup at a time. You’ll notice the texture becoming thicker and a bit more dough-like with each addition. Take your time—this step ensures your Butterfinger Balls are easy to shape and hold together perfectly once chilled.
Step 3: Fold in Crushed Butterfinger Bars
Once your “dough” is ready, gently stir in that magical ingredient—crushed Butterfinger bars! Fold until evenly distributed, then reserve a sprinkle for later (you’ll thank yourself when it’s time to garnish).
Step 4: Chill the Mixture
Pop the bowl in the fridge for 30 minutes. Chilling makes the mixture so much easier to handle and keeps your hands (mostly) mess-free when forming the Butterfinger Balls later.
Step 5: Roll into Balls and Chill Again
Using a small scoop or your hands, roll the mixture into bite-sized balls and place them on a parchment-lined pan. Once they’re all formed, chill for another 30 minutes. This step keeps them firm and ready for their chocolate bath.
Step 6: Melt Chocolate and Oil Together
In a microwave-safe bowl, combine the chocolate chips and your choice of coconut or vegetable oil. Heat at 50% power for one minute, stir, then keep microwaving in short increments until the chocolate is just melted and smooth. That tiny bit of oil really turns the chocolate into a dipping dream.
Step 7: Dip and Decorate
One by one, dip each chilled ball into the melted chocolate using a fork for easy maneuvering. Let the excess drip off before placing them back on the pan. While the chocolate is still shiny, sprinkle each with reserved crushed Butterfinger bars for color and crunch.
Step 8: Let the Chocolate Set
Allow the chocolate to set at room temperature. This final rest ensures each Butterfinger Ball sports a smooth, snappy shell—no sticky fingers, no mess, just pure delight!
Step 9: Enjoy!
Once the chocolate has set, your Butterfinger Balls are officially ready to serve. Gather your friends and family—or stash a secret stash just for yourself. There’s no wrong way to enjoy these gems!
How to Serve Butterfinger Balls
Garnishes
Garnishing Butterfinger Balls is the best way to add that irresistible final flourish. A sprinkle of reserved crushed Butterfinger bars makes them pop with color and gives everyone a little preview of the flavor inside. You could also dust them with powdered sugar or drizzle melted peanut butter on top for a striking stripe—go fancy or keep it classic, they’ll look irresistible either way.
Side Dishes
Since Butterfinger Balls are quite rich, pair them with light sides to balance the experience. Think a simple bowl of fresh strawberries or orange slices for a pop of freshness, or a platter of salty snacks like pretzels to play up the sweet-salty combo. For celebrations, serve them alongside a scoop of vanilla ice cream or a steaming mug of coffee—absolute perfection.
Creative Ways to Present
The sky’s the limit for presentation! Pile Butterfinger Balls high on a tiered stand for a party centerpiece, nestle them in mini cupcake liners for a polished look, or skewer them on sticks for a playful, portable treat. For gift-giving, arrange them in a decorative tin or clear cellophane bags tied with ribbon—instant homemade happiness!
Make Ahead and Storage
Storing Leftovers
Butterfinger Balls store beautifully. Simply transfer them to an airtight container and keep them in the fridge for up to a week. Stack them in single layers separated by parchment paper to prevent sticking. They’re always ready for a quick treat or a last-minute party platter!
Freezing
If you want to get ahead for holidays or special occasions, Butterfinger Balls freeze remarkably well. Place them on a baking sheet in a single layer to freeze initially (so they won’t stick together), then transfer to a zip-top bag or container for longer storage. They’ll keep well for up to three months—just let them thaw before eating for best texture.
Reheating
No reheating necessary! In fact, Butterfinger Balls are best enjoyed cold straight from the fridge or at cool room temperature. If you’re thawing frozen ones, let them rest on the counter for about 20-30 minutes before serving to soften slightly and bring out that creamy, dreamy center.
FAQs
Can I use crunchy peanut butter instead of creamy?
Absolutely! Crunchy peanut butter will add even more texture to your Butterfinger Balls. Just know the mixture may be slightly chunkier and a little more challenging to roll, but the extra peanuts can be a fun twist.
Do Butterfinger Balls need to stay refrigerated?
Yes, since they contain butter and peanut butter, it’s best to store Butterfinger Balls in the fridge. This keeps them firm, fresh, and perfect for grabbing anytime you need a quick treat.
Can I substitute another candy for the Butterfinger bars?
You sure can! Try using crushed toffee bars or other crisp, chocolatey candies for a different flavor profile. However, nothing quite matches the iconic taste and texture of real Butterfinger bars in these treats.
What’s the best way to crush Butterfinger bars?
For easy, mess-free crushing, put your Butterfinger bars in a sealed plastic bag and smash them gently with a rolling pin. Aim for a mix of fine crumbs and small chunks for the best blend of crunch and flavor in the finished Butterfinger Balls.
How can I make Butterfinger Balls gluten free?
Most of the ingredients are naturally gluten free, but definitely check your Butterfinger bars and chocolate chips to ensure they’re gluten free (and haven’t been cross-contaminated during manufacturing). Substitute if needed, and enjoy without worry!
Final Thoughts
If you love easy desserts that taste like a million bucks, you owe it to yourself to whip up a batch of Butterfinger Balls. They’re fun, foolproof, and impossible to resist—perfect for parties, gifts, or just a sweet snack at the end of a long day. Go ahead and give them a try, then get ready to watch them vanish faster than you’d ever expect!
PrintButterfinger Balls Recipe

These Butterfinger Balls are a delightful sweet treat perfect for any occasion. Creamy peanut butter and crushed Butterfinger bars coated in rich chocolate create a delicious combination that will satisfy any sweet tooth.
- Prep Time: 20 minutes
- Cook Time: 0 minutes
- Total Time: 1 hour
- Yield: Makes about 24 balls 1x
- Category: Dessert
- Method: Mixing, Chilling, Dipping
- Cuisine: American
- Diet: Vegetarian
Ingredients
Peanut Butter Mixture:
- 1 ½ cups peanut butter
- ½ cup butter, softened
- ½ teaspoon vanilla
- 2 cups Powdered Sugar
Coating:
- 1 cup Crushed Butterfinger Bars
- 3 cups chocolate chips, semi-sweet
- 1 tablespoon coconut oil or vegetable oil
Instructions
- Combine Peanut Butter Mixture: In a mixing bowl, combine peanut butter, softened butter, and vanilla. Mix on medium speed until fluffy.
- Mix in Powdered Sugar: Gradually add powdered sugar to the peanut butter mixture, mixing until fully incorporated.
- Add Crushed Butterfinger Bars: Fold in the crushed Butterfinger bars, reserving some for topping. Chill the mixture for 30 minutes.
- Roll into Balls: Shape the mixture into balls and place them on a parchment-lined pan. Chill for another 30 minutes.
- Prepare Chocolate Coating: In a small bowl, combine chocolate chips and coconut oil. Microwave in 30-second intervals at 50% power until melted, stirring between intervals.
- Coat the Balls: Dip each ball into the melted chocolate using a fork, ensuring they are completely coated. Shake off any excess chocolate and return the balls to the pan. Sprinkle the reserved crushed Butterfinger bars on top.
- Set the Chocolate: Allow the chocolate-coated balls to set at room temperature until firm.
- Serve and Enjoy: Once set, the Butterfinger Balls are ready to be served and enjoyed!
Notes
- You can store these Butterfinger Balls in an airtight container in the refrigerator for up to one week.
- Feel free to get creative with toppings or coatings for a personalized touch!
Nutrition
- Serving Size: 1 ball
- Calories: 180
- Sugar: 14g
- Sodium: 100mg
- Fat: 12g
- Saturated Fat: 6g
- Unsaturated Fat: 5g
- Trans Fat: 0g
- Carbohydrates: 18g
- Fiber: 1g
- Protein: 3g
- Cholesterol: 5mg
Keywords: Butterfinger Balls, Peanut Butter, Chocolate, Dessert, Sweet Treat

