Caramelized Pears and Blue Cheese Tart Recipe
Introduction
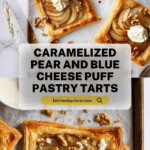
These Caramelized Pears and Blue Cheese Tarts combine sweet, buttery pears with tangy blue cheese for a sophisticated appetizer or dessert. The flaky puff pastry base adds a delightful crunch, making each bite a perfect balance of flavors and textures.

Ingredients
- 1 sheet store bought frozen puff pastry, thawed (25 cm x 25 cm / 10″ x 10″)
- 2 pears
- 2 tbsp unsalted butter
- 1/3 cup brown sugar, lightly packed
- Pinch of salt
- 1 egg, lightly beaten
- 1/3 to 1/2 cup crumbled blue cheese (I used gorgonzola)
- 3 tbsp walnuts, roughly chopped
Instructions
- Step 1: Preheat the oven to 180°C (350°F) and line a baking tray with parchment paper.
- Step 2: Cut the puff pastry into 4 equal squares and place them on the prepared baking tray.
- Step 3: Score a 2/3 inch (1.5 cm) border around each pastry square without cutting all the way through.
- Step 4: Cut each pear into quarters, remove the core, then slice each quarter into 3 or 4 thin pieces.
- Step 5: In a small frying pan or saucepan over medium-high heat, combine the pear slices, butter, brown sugar, and salt. Cook for about 5 minutes, stirring occasionally, until the pears soften and the mixture forms a syrup.
- Step 6: Remove from heat and let cool for 5 minutes. Meanwhile, brush the edges of the pastry squares with the beaten egg.
- Step 7: Spoon the pear mixture onto each pastry square, keeping the filling inside the scored border. Drizzle some of the syrup over the pears.
- Step 8: Bake for 20 to 25 minutes, or until the pastry is deep golden brown. Add the walnuts to the baking tray during the last 5 minutes of baking to toast them lightly.
- Step 9: Remove the tarts from the oven and let them cool for 5 minutes.
- Step 10: Top each tart with crumbled blue cheese, scatter toasted walnuts over them, and drizzle with any remaining syrup. Serve immediately, optionally with yogurt on the side.
Tips & Variations
- For a milder cheese flavor, substitute blue cheese with goat cheese or feta.
- Use ripe but firm pears to avoid overly mushy filling.
- Adding a sprinkle of fresh thyme leaves before baking can enhance the savory notes.
- Walnuts can be replaced with pecans or almonds for a different crunch.
Storage
Store leftover tarts in an airtight container in the refrigerator for up to 2 days. Reheat gently in a low oven or toaster oven to keep the pastry crisp. Avoid microwaving as it may soften the crust.
How to Serve

Serve this delicious recipe with your favorite sides.
FAQs
Can I make these tarts ahead of time?
You can prepare the pear mixture in advance and store it in the refrigerator for up to 24 hours. Assemble and bake the tarts just before serving for best texture and flavor.
What type of pears work best in this recipe?
Firm pears such as Bosc, Anjou, or Bartlett hold up well during cooking and caramelizing, providing a good balance of sweetness and texture.
PrintCaramelized Pears and Blue Cheese Tart Recipe
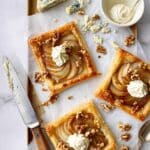
These Caramelized Pears and Blue Cheese Tarts combine the sweetness of caramelized pears with the tangy richness of blue cheese, all nestled in a flaky puff pastry crust. Topped with toasted walnuts for crunch, these elegant tarts make a perfect appetizer or light dessert that balances sweet, savory, and nutty flavors.
- Prep Time: 15 minutes
- Cook Time: 30 minutes
- Total Time: 45 minutes
- Yield: 4 tarts 1x
- Category: Appetizer
- Method: Baking
- Cuisine: French-inspired
Ingredients
Puff Pastry
- 1 sheet store-bought frozen puff pastry, thawed (25 cm x 25 cm / 10″ x 10″)
Filling
- 2 pears
- 2 tbsp unsalted butter
- 1/3 cup brown sugar, lightly packed
- Pinch of salt
Toppings
- 1 egg, lightly beaten
- 1/3 to 1/2 cup crumbled blue cheese (gorgonzola recommended)
- 3 tbsp walnuts, roughly chopped
Instructions
- Preheat Oven and Prepare Baking Tray: Preheat your oven to 180°C (350°F) and line a baking tray with parchment or baking paper to prevent sticking.
- Cut Puff Pastry: Slice the thawed puff pastry sheet into 4 equal squares and transfer them carefully onto the prepared baking tray.
- Score Pastry Borders: Using a knife, score a 2/3 inch (approximately 1.5 cm) border around each square, being careful not to cut all the way through, to help the edges rise for a defined tart edge.
- Prepare Pears: Core the pears and cut each quarter into 3 or 4 thin slices to ensure even caramelization and layering.
- Caramelize Pears: In a small frying pan or saucepan over medium-high heat, combine the pear slices, unsalted butter, brown sugar, and a pinch of salt. Cook, stirring occasionally, for about 5 minutes until the pears are softened and a syrup forms from the caramelized sugar and pear juices.
- Cool and Egg Wash: Remove the caramelized pears from heat and let them cool for 5 minutes. Meanwhile, brush the scored borders of each pastry square with the lightly beaten egg to give them a golden finish when baked.
- Assemble Tarts: Pile the caramelized pear mixture onto each pastry square, staying inside the egg-washed border. Drizzle some of the caramel syrup over the pears for extra flavor.
- Bake and Toast Walnuts: Place the baking tray in the oven and bake the tarts for 20 to 25 minutes until the pastry is deep golden brown. For the last 5 minutes, sprinkle the chopped walnuts on the tray to toast lightly alongside the tarts.
- Cool Slightly: Remove the tarts from the oven and allow them to cool for about 5 minutes, which helps set the filling slightly.
- Add Final Toppings and Serve: Top each tart with crumbled blue cheese and scatter the toasted walnuts on top. Drizzle any remaining syrup over the tarts. Serve these warm, optionally with yogurt on the side for a creamy contrast.
Notes
- Note 1: Cutting the puff pastry into squares helps create individual tarts that are easy to serve.
- Note 2: Scoring a border prevents the center from puffing up too much, creating a crust that holds the filling well.
- Note 3: The egg wash on the border gives the pastry a lovely golden color and a glossy finish after baking.
- You can substitute walnuts with pecans or almonds for different nutty flavors.
- Serve immediately for the best texture as the pastry will be crisp and the cheese slightly melted.
Keywords: caramelized pears, blue cheese tarts, puff pastry recipe, savory tarts, appetizer recipe, gorgonzola tarts, walnut topping, easy baking recipe


