Chocolate Peppermint Cookie Cups Recipe
Introduction
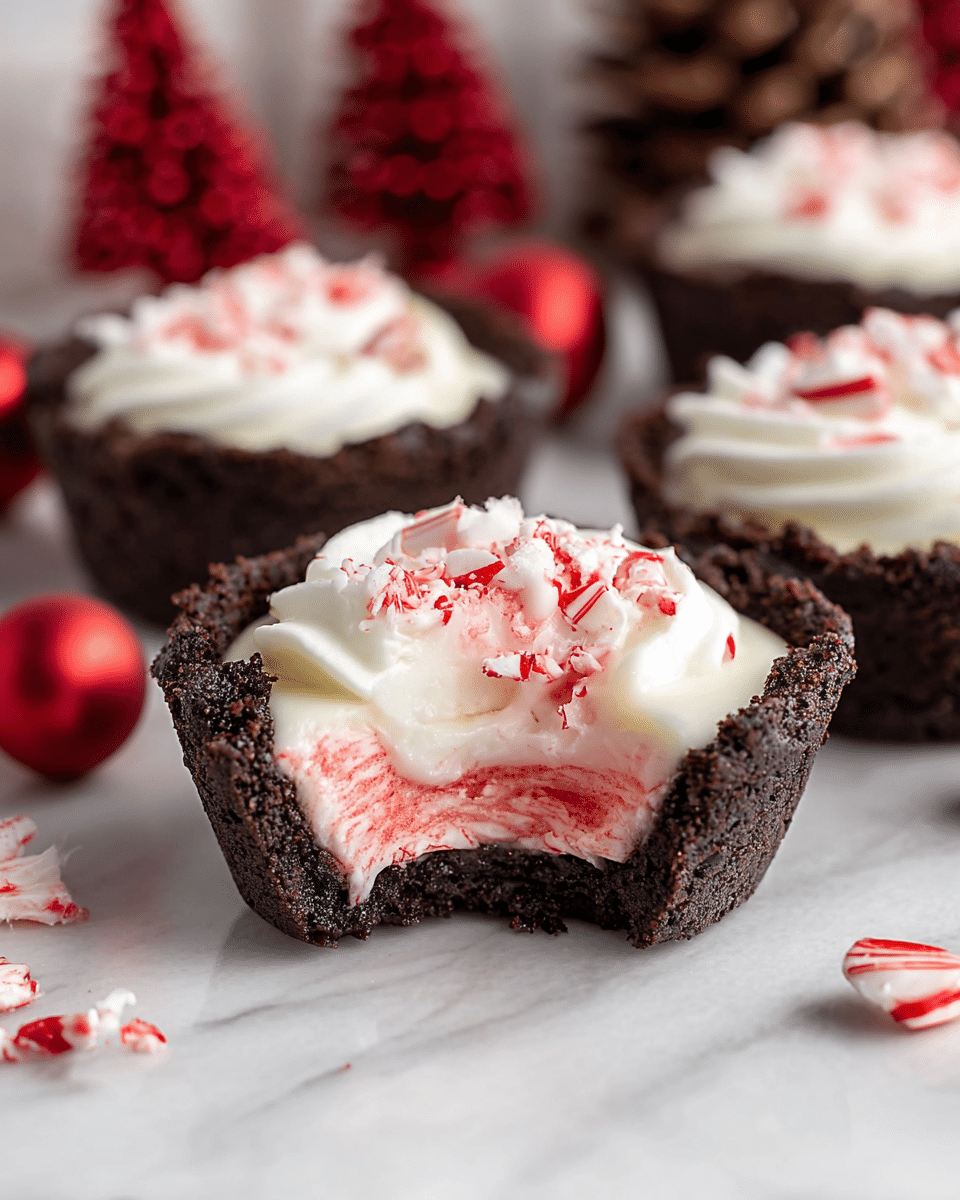
Chocolate Peppermint Cookie Cups are a festive and indulgent treat perfect for the holiday season. These soft chocolate cookie cups are filled with creamy peppermint cheesecake and topped with crunchy candy canes for a delightful contrast of flavors and textures.
Ingredients
- 2 cups all-purpose flour
- 1/4 cup Dutch-processed cocoa powder (sifted)
- 1/4 cup black cocoa powder
- 1 tsp baking soda
- 1/2 tsp salt
- 1 cup unsalted butter (room temperature)
- 1/2 cup granulated sugar
- 1 cup light brown sugar (packed)
- 2 large eggs (room temperature)
- 1 tsp vanilla extract
- 1 cup heavy whipping cream (chilled)
- 8 oz cream cheese (full fat)
- 1/2 cup granulated sugar
- 1 tsp peppermint extract
- Red color gel
- Candy canes (chopped)
Instructions
- Step 1: Preheat your oven to 350°F (175°C) and lightly spray two regular-sized cupcake tins with cooking spray.
- Step 2: In a bowl, whisk together the flour, Dutch-processed cocoa powder, black cocoa powder, baking soda, and salt. Set this dry mixture aside.
- Step 3: Using a mixer, beat the butter and both sugars on medium-high speed until the mixture is light and fluffy, about 2 to 3 minutes. Reduce speed, then add the eggs one at a time, followed by the vanilla extract. Beat until just combined.
- Step 4: Gradually add the flour mixture to the wet ingredients and mix until just combined without overmixing.
- Step 5: Using a large cookie scoop (about 3 tablespoons), portion the dough into the prepared muffin tins.
- Step 6: Bake the cookie cups for 10 to 13 minutes, until they are mostly set but still slightly soft in the center.
- Step 7: Remove the tins from the oven and immediately press down firmly in the center of each cookie cup using the bottom of a small jar or container to create a well.
- Step 8: Let the cookie cups cool in the pans for 10 minutes. Then gently twist each to loosen them and cool for an additional 5 minutes before transferring to a wire rack to cool completely.
- Step 9: For the peppermint cheesecake filling, whip the chilled heavy cream until stiff peaks form, ideally using a cold bowl and whisk.
- Step 10: In a separate bowl, beat the cream cheese, granulated sugar, and peppermint extract until smooth and creamy.
- Step 11: Gently fold the whipped cream into the cream cheese mixture until well combined.
- Step 12: Using a small food-safe paintbrush, paint two red stripes inside a piping bag fitted with a large round tip using the red color gel. Carefully fill the bag with the cheesecake filling.
- Step 13: Pipe a generous swirl of the filling into each cooled cookie cup and refrigerate for 1 to 2 hours until set.
- Step 14: Sprinkle the tops with chopped candy canes if desired, then serve chilled.
Tips & Variations
- For an extra deep chocolate flavor, use all Dutch-processed cocoa or add a tablespoon of espresso powder to the dough.
- If you don’t have black cocoa powder, you can substitute it with additional Dutch-processed cocoa powder.
- Use crushed peppermint sticks or white chocolate chips for a different festive topping.
- Make the cheesecake filling a day ahead and store it refrigerated to save time on the day of serving.
Storage
Store the cookie cups in an airtight container in the refrigerator for up to 2 to 3 days. For longer storage, freeze them without the chopped candy cane topping for up to 4 weeks. To serve after freezing, thaw overnight in the refrigerator. If desired, add the candy cane topping just before serving to maintain crunch.
How to Serve

Serve this delicious recipe with your favorite sides.
FAQs
Can I make the cookie cups dairy-free?
Yes, you can substitute the butter with a dairy-free margarine and use non-dairy cream cheese and whipped cream alternatives. Be sure to check that the cocoa powders and extracts are also dairy-free.
Can I use regular cocoa powder instead of black cocoa powder?
Yes, but the cookie cups will have a lighter color and slightly different flavor. Black cocoa powder adds a richer, more intense chocolate flavor and a darker color, but regular cocoa powder works fine if black is unavailable.
PrintChocolate Peppermint Cookie Cups Recipe

Delightfully rich and festive Chocolate Peppermint Cookie Cups featuring a soft and fudgy chocolate cookie base filled with creamy peppermint cheesecake. Perfect for holiday gatherings or special occasions, these cookie cups combine the decadence of cocoa with refreshing peppermint flavor and a crunchy candy cane topping.
- Prep Time: 25 minutes
- Cook Time: 13 minutes
- Total Time: 1 hour 40 minutes
- Yield: 24 cookie cups 1x
- Category: Dessert
- Method: Baking
- Cuisine: American
Ingredients
Chocolate Cookie Cups
- 2 cups all-purpose flour
- 1/4 cup Dutch-processed cocoa powder (sifted)
- 1/4 cup black cocoa powder
- 1 tsp baking soda
- 1/2 tsp salt
- 1 cup unsalted butter (room temperature)
- 1/2 cup granulated sugar
- 1 cup light brown sugar (packed)
- 2 large eggs (room temperature)
- 1 tsp vanilla extract
Peppermint Cheesecake Filling
- 1 cup heavy whipping cream (chilled)
- 8 oz cream cheese (full fat)
- 1/2 cup granulated sugar
- 1 tsp peppermint extract
- red color gel (for decorating)
- candy canes (chopped, for garnish)
Instructions
- Preheat Oven and Prepare Pans: Preheat your oven to 350°F (175°C). Spray two regular-sized cupcake tins thoroughly with cooking spray to prevent sticking.
- Mix Dry Ingredients: In a medium bowl, whisk together 2 cups of all-purpose flour, 1/4 cup Dutch-processed cocoa powder, 1/4 cup black cocoa powder, 1 teaspoon baking soda, and 1/2 teaspoon salt. Set this mixture aside.
- Cream Butter and Sugars: Using a stand mixer or hand mixer, beat 1 cup unsalted butter (at room temperature), 1/2 cup granulated sugar, and 1 cup packed light brown sugar on medium-high speed until light and fluffy, about 2 to 3 minutes.
- Add Eggs and Vanilla: Reduce the mixer speed to low and add 2 large eggs, one at a time, making sure each is fully incorporated. Then add 1 teaspoon vanilla extract and beat until combined.
- Combine Wet and Dry Ingredients: Gradually add the flour and cocoa mixture to the butter and sugar mixture. Stir gently until just combined; do not overmix.
- Scoop Dough: Using a large cookie scoop (approximately 3 tablespoons), portion the dough evenly into the prepared muffin tins, filling each cup.
- Bake: Bake in the preheated oven for about 10 to 13 minutes, or until the cookies are mostly set but still soft in the center.
- Create Cookie Cups: Immediately after removing the pans from the oven, press down firmly in the center of each cookie using a small jar or container to create a well for the filling.
- Cool Cookies: Allow the cookie cups to cool in the pans for 10 minutes. Then gently loosen them by twisting slightly in the pan, cool for 5 additional minutes, and finally remove them to a wire rack to cool completely.
- Whip Cream: In a cold mixing bowl with cold beaters, whip 1 cup chilled heavy whipping cream until stiff peaks form.
- Prepare Cheesecake Mixture: In a separate bowl, beat 8 ounces full-fat cream cheese with 1/2 cup granulated sugar and 1 teaspoon peppermint extract until the mixture is smooth and creamy.
- Combine Whipped Cream and Cheesecake: Gently fold the whipped cream into the cream cheese mixture until well combined and light.
- Decorate Piping Bag: Use a small food-safe paintbrush to paint two stripes of red color gel inside a piping bag fitted with a large round tip for a festive swirl effect.
- Fill and Pipe: Fill the piping bag with the peppermint cheesecake filling, then pipe swirls into the cooled cookie cups.
- Refrigerate: Place the filled cookie cups in the refrigerator and chill for about 1 to 2 hours to set the filling.
- Garnish and Serve: Before serving, sprinkle the cookie cups with chopped candy canes if desired. Serve chilled and enjoy within 2 to 3 days for best flavor and texture. Optionally, freeze for up to 4 weeks without the candy cane garnish.
Notes
- Room temperature eggs and butter help with easier mixing and better texture.
- Use a cold bowl and beaters to whip the cream for stiff peaks more effectively.
- The red gel stripes inside the piping bag add a festive decorative touch to the cheesecake swirl.
- For best results, do not overbake the cookie cups; they should remain soft in the center.
- These cookie cups can be frozen without the candy cane topping for up to 4 weeks.
- Chopped candy canes add a crunchy texture and enhanced peppermint flavor.
Keywords: chocolate peppermint cookie cups, peppermint cheesecake cookies, holiday cookie cups, festive desserts, chocolate cookie cups with cream cheese filling

