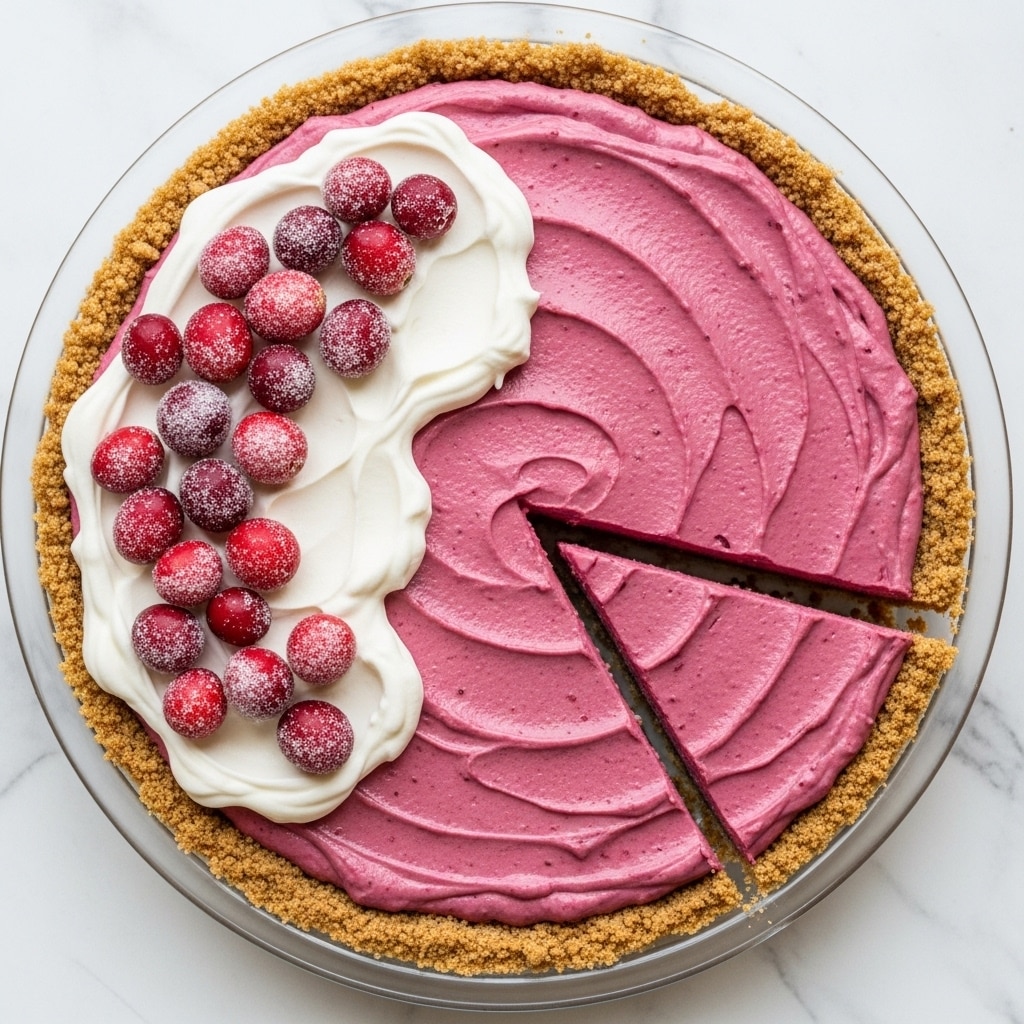
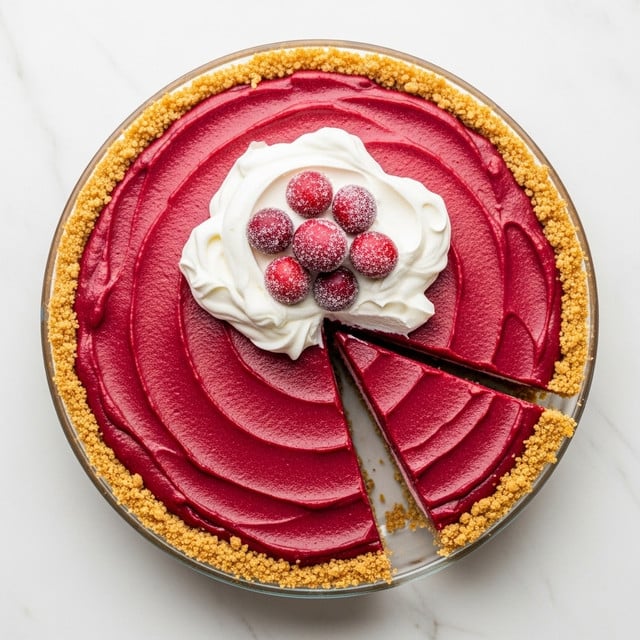
Cranberry Pie with Ginger-Coconut Filling and Biscoff Crust Recipe
Introduction
This vibrant cranberry pie offers a delightful balance of tartness and sweetness, perfect for festive gatherings or cozy nights in. Featuring a unique Biscoff cookie crust and a creamy, spiced filling, it’s a refreshing twist on a classic dessert.
Ingredients
- 1/4 cup butter, melted, plus more for pie plate
- 1 package Biscoff cookies, finely crushed
- 1/2 teaspoon kosher salt
- 1 packet powdered gelatin
- 10 oz. fresh or frozen cranberries
- 3/4 cup packed brown sugar
- 1 medium orange (juice and zest)
- 1 can full-fat coconut milk
- 1 teaspoon freshly grated ginger
- 2 tablespoons heavy cream
- 1/2 teaspoon almond extract
- 1/4 teaspoon kosher salt
- Whipped cream, for serving
Instructions
- Step 1: Preheat the oven to 350°F (175°C) and grease a 9-inch pie plate with butter.
- Step 2: Make the crust by stirring together the Biscoff cookie crumbs, melted butter, and 1/2 teaspoon kosher salt in a large bowl. Press the mixture firmly into the bottom and up the sides of the prepared pie plate.
- Step 3: Bake the crust for about 10 minutes, or until golden and firm. Remove from the oven and transfer to a wire rack to cool completely.
- Step 4: In a small bowl, combine the powdered gelatin with 1/4 cup cold water. Set aside to bloom for 10 minutes.
- Step 5: In a medium saucepan over medium heat, combine the cranberries, brown sugar, orange juice, and zest. Bring to a simmer, stirring occasionally until most cranberries burst and the mixture thickens slightly, about 7 minutes.
- Step 6: Add the coconut milk, grated ginger, heavy cream, almond extract, and 1/4 teaspoon kosher salt to the saucepan. Stir well, heat until steaming but not simmering, then remove from heat. Stir in the bloomed gelatin until fully dissolved.
- Step 7: Use a blender, food processor, or immersion blender to puree the cranberry mixture until smooth. Strain through a fine mesh sieve into a bowl, discarding solids, and let the mixture cool to room temperature.
- Step 8: Pour the cooled cranberry filling into the prepared crust. Refrigerate for at least 6 hours, or until completely set. Serve chilled with a dollop of whipped cream.
Tips & Variations
- For extra depth, add a pinch of cinnamon or nutmeg to the filling while cooking.
- Substitute graham crackers for Biscoff cookies to create a classic pie crust.
- Use freshly squeezed orange juice and zest for the brightest flavor.
- If you prefer a less creamy texture, omit the heavy cream and coconut milk, replacing with plain yogurt after cooling.
Storage
Store any leftover cranberry pie covered in the refrigerator for up to 3 days. To serve, let it sit at room temperature for a few minutes for easier slicing. This pie is best enjoyed chilled and does not reheat well, as the gelatin filling will lose its texture.
How to Serve
Serve this delicious recipe with your favorite sides.
FAQs
Can I use frozen cranberries?
Yes, frozen cranberries work perfectly. No need to thaw them before cooking; just add them directly to the saucepan.
How do I know when the pie is fully set?
The pie filling should be firm to the touch and not jiggle when you gently shake the pie plate. Chilling for at least 6 hours is essential for the gelatin to fully set the filling.
PrintCranberry Pie with Ginger-Coconut Filling and Biscoff Crust Recipe

This vibrant Cranberry Pie features a unique Biscoff cookie crust and a luscious, smooth cranberry filling enriched with coconut milk, fresh ginger, and almond extract. Perfectly sweetened with brown sugar and balanced with the bright citrus notes of orange, this no-bake pie sets beautifully in the refrigerator, making it an elegant dessert for holiday gatherings or any special occasion.
- Prep Time: 20 minutes
- Cook Time: 17 minutes
- Total Time: 6 hours 37 minutes
- Yield: 8 servings 1x
- Category: Dessert
- Method: Baking
- Cuisine: American
Ingredients
Crust
- 1 package Biscoff cookies, finely crushed
- 1/4 cup butter, melted, plus more for greasing pie plate
- 1/2 teaspoon kosher salt
Filling
- 1 packet powdered gelatin
- 1/4 cup cold water (for gelatin bloom)
- 10 oz fresh or frozen cranberries
- 3/4 cup packed brown sugar
- 1 medium orange (juice and zest)
- 1 can full-fat coconut milk
- 1 teaspoon freshly grated ginger
- 2 tablespoons heavy cream
- 1/2 teaspoon almond extract
- 1/4 teaspoon kosher salt
To Serve
- Whipped cream
Instructions
- Preheat and prepare pie plate. Preheat your oven to 350°F (175°C) and lightly grease a 9-inch pie plate with butter to prevent sticking.
- Make the crust. In a large bowl, mix the finely crushed Biscoff cookies with melted butter and 1/2 teaspoon kosher salt until the mixture resembles wet sand. Press this mixture evenly into the bottom and up the sides of the prepared pie plate to form the crust.
- Bake the crust. Place the crust in the oven and bake until golden and firm, about 10 minutes. Remove from the oven and transfer to a wire rack to cool completely.
- Bloom the gelatin. While the crust cools, combine the powdered gelatin with 1/4 cup cold water in a small bowl. Let it sit for 10 minutes to bloom (absorb the water and swell).
- Cook the cranberry filling. In a medium saucepan over medium heat, combine the cranberries, brown sugar, orange juice, and orange zest. Bring to a gentle simmer, cooking and stirring occasionally, until most of the cranberries have burst and the mixture thickens slightly, about 7 minutes.
- Add remaining filling ingredients. Stir in the coconut milk, freshly grated ginger, heavy cream, almond extract, and 1/4 teaspoon kosher salt. Heat the mixture until steaming, ensuring it does not simmer, then remove from heat. Stir in the bloomed gelatin until fully dissolved.
- Puree and strain the filling. Use a blender, food processor, or immersion blender to puree the cranberry mixture until smooth. Pour the puree through a fine sieve into a bowl, discarding any solids. Allow the mixture to cool to room temperature.
- Chill and set the pie. Pour the cooled cranberry filling into the baked crust and refrigerate for at least 6 hours or until completely set.
- Serve. Once set, serve the pie chilled topped with a dollop of whipped cream.
Notes
- Ensure the gelatin does not boil as it will lose its setting properties.
- For a smoother texture, strain the cranberry filling thoroughly to remove seeds and pulp.
- Using frozen cranberries is convenient and works just as well as fresh.
- Allow sufficient chilling time to achieve a firm, sliceable pie.
- Biscoff cookie crumbs provide a unique flavor and texture to the crust, but graham crackers can be a substitute if unavailable.
Keywords: cranberry pie, Biscoff cookie crust, no-bake pie, holiday dessert, cranberry dessert, coconut milk pie
