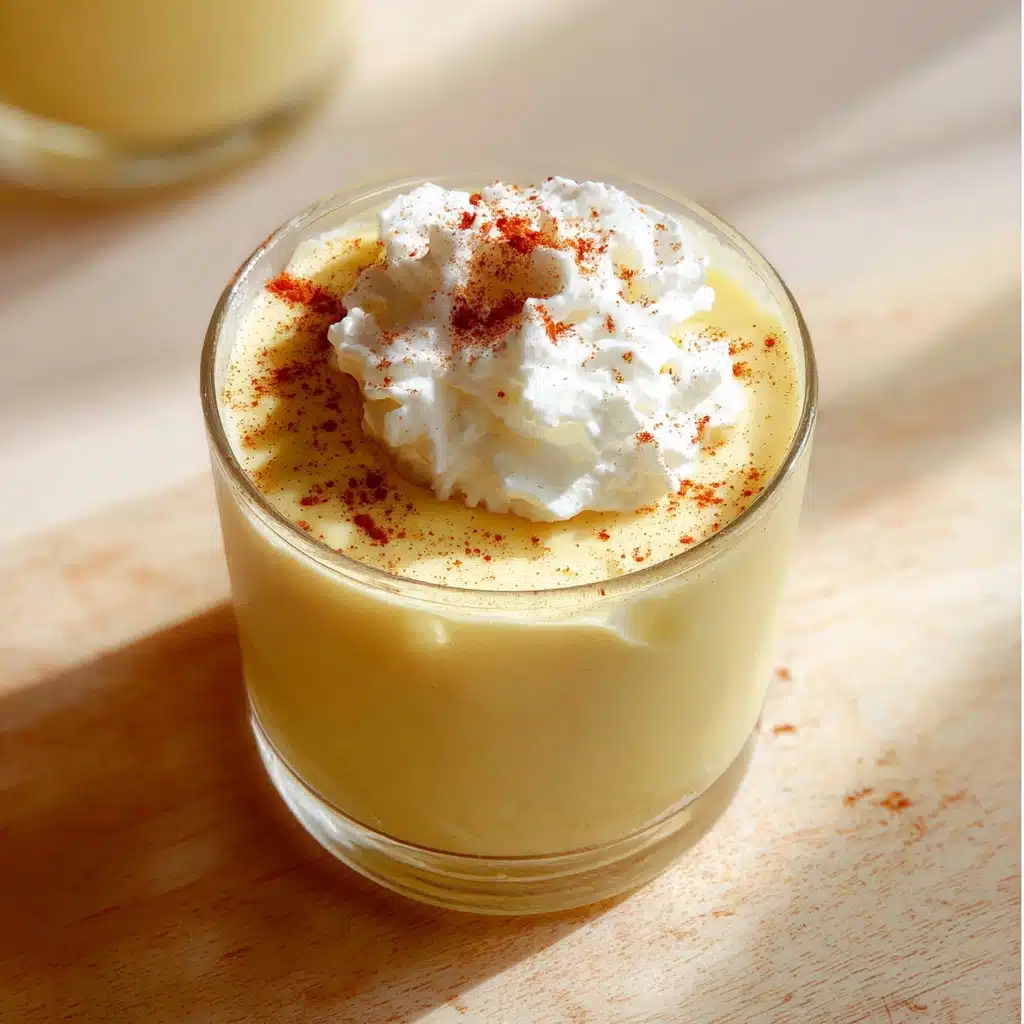
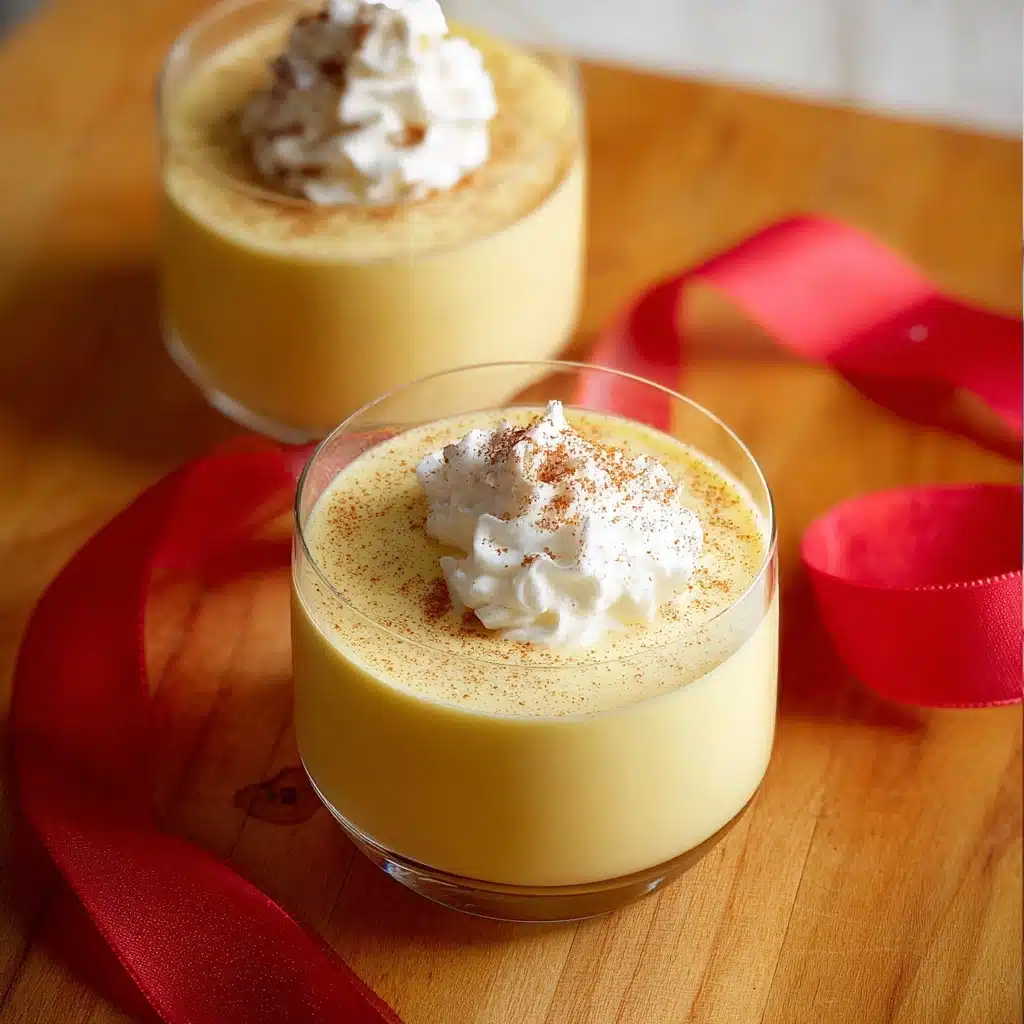
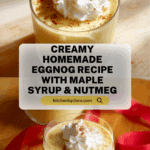
Creamy Homemade Eggnog Recipe
There is something truly magical about the holiday season, and nothing captures that festive spirit quite like a glass of Creamy Homemade Eggnog. This luscious, velvety delight brings together rich egg yolks, warm spices, and a hint of pure maple sweetness for a comforting, nostalgic treat that feels like a warm hug in a cup. Whether you’re gathering with loved ones or simply craving a special indulgence on a cozy night, this recipe will quickly become a cherished staple on your holiday menu.
Ingredients You’ll Need
The beauty of this Creamy Homemade Eggnog lies in its simplicity. Each ingredient plays a vital role to create that perfect balance of creamy texture, smooth flavor, and festive aroma you’ll savor with every sip.
- 8 large egg yolks: They are the rich foundation that gives eggnog its signature creamy thickness.
- 1/4 cup sugar: Provides the essential sweetness without overpowering the flavors.
- 1/4 cup pure maple syrup: Adds a natural, warm sweetness with subtle complexity.
- 2 teaspoons vanilla: Infuses the eggnog with comforting vanilla warmth for depth.
- 1 cup heavy whipping cream: Contributes luscious creaminess that makes each sip indulgent.
- 3 cups 2% milk: Lightens up the mixture while maintaining silky texture.
- 1/2 teaspoon ground nutmeg: Brings a classic holiday spice that perfumes the entire drink.
- Brandy or rum (to serve): A boozy addition to elevate your eggnog experience if you like.
- Cinnamon and additional heavy whipping cream (to serve): Perfect garnishes to add flavor, texture, and festive flair.
How to Make Creamy Homemade Eggnog
Step 1: Whisk the Egg Yolks and Sugar
Start by whisking those 8 large egg yolks with 1/4 cup of sugar until the mixture becomes smooth and slightly paler in color. This simple step is crucial because it dissolves the sugar and starts to build the base that will thicken as you add warm ingredients.
Step 2: Heat the Creamy Milk Mixture
In a medium saucepan, combine 1 cup heavy whipping cream, 3 cups 2% milk, 1/4 cup pure maple syrup, 2 teaspoons vanilla, and 1/2 teaspoon ground nutmeg. Slowly heat this mixture over medium heat to about 165 degrees Fahrenheit, whisking often. Just a heads up—don’t let it boil! This warming process melds the flavors and dissolves the maple syrup beautifully.
Step 3: Temper the Eggs
This step is all about gently bringing the eggs up to temperature without scrambling them. Slowly drizzle the warm cream mixture into your egg yolk bowl a little at a time, whisking constantly. This gradual warming is key to a silky smooth Creamy Homemade Eggnog without lumps. Once about half of the hot liquid is combined, pour everything back into the saucepan and heat again until it reaches 165 degrees, stirring frequently.
Step 4: Chill and Thicken
Transfer your creamy, spiced eggnog into a glass pitcher and cover it tightly. Refrigerate until it’s wonderfully chilled and slightly thickened—this usually takes a few hours or overnight. The resting period allows the flavors to mingle and deepen, giving you that luscious, velvety consistency you’re craving.
Step 5: Serve with a Festive Twist
When it’s time to enjoy your Creamy Homemade Eggnog, consider adding a splash of brandy or rum for that classic spirited kick. Finish off with a swirl of heavy cream, a sprinkle of cinnamon, and maybe a cinnamon stick for stirring. It’s the perfect presentation to impress your guests or cozy up on your own!
How to Serve Creamy Homemade Eggnog
Garnishes
Garnishes can truly elevate your eggnog experience. A generous swirl of freshly whipped heavy cream gives an airy contrast to the dense custard flavor, while a dusting of cinnamon or freshly grated nutmeg adds aroma and visual appeal. Don’t forget the cinnamon stick—it doubles as a fun stirrer and an extra fragrant hint of spice.
Side Dishes
Pair your Creamy Homemade Eggnog with rich or spiced baked goods, like gingerbread cookies, cinnamon rolls, or buttery shortbread. These treats complement the eggnog’s warm spices and sweetness perfectly and help balance the creamy richness with a crunchy bite.
Creative Ways to Present
Looking to make your eggnog the centerpiece of your holiday gathering? Serve it in clear glass mugs or stemmed glasses to showcase its creamy texture. You can even rim the glasses with cinnamon sugar for an elegant touch. For a playful twist, float a few toasted marshmallows on top or add a splash of espresso for a sophisticated twist that coffee lovers will adore.
Make Ahead and Storage
Storing Leftovers
Your Creamy Homemade Eggnog keeps beautifully in the fridge for up to three days. Just be sure to cover it tightly to preserve its freshness and prevent it from absorbing other fridge odors. Give it a gentle stir before serving as natural separation may occur.
Freezing
While freezing is possible, it’s generally not recommended for this eggnog because the texture may change, becoming grainy as the dairy components separate. For the best taste and creaminess, enjoy your eggnog fresh within a few days of making it.
Reheating
If you prefer your eggnog warm, gently reheat it on the stove over low heat, stirring frequently. Avoid boiling to keep the smooth, creamy texture intact. Add more whipped cream or a sprinkle of nutmeg just before serving to recreate that cozy vibe.
FAQs
Can I make Creamy Homemade Eggnog without alcohol?
Absolutely! This recipe is delicious on its own, and many enjoy it as a festive non-alcoholic treat. The brandy or rum is completely optional and can be added after chilling for those who want an adult version.
Is it safe to use raw eggs in homemade eggnog?
This recipe gently heats the eggs to 165 degrees Fahrenheit, which is the temperature needed to kill harmful bacteria while preserving the eggs’ creamy richness. This process, known as tempering, makes it safe to enjoy.
Can I use a different sweetener instead of maple syrup?
Yes, you can swap maple syrup for honey, agave, or additional sugar if preferred. Each sweetener will subtly change the flavor profile, but maple syrup offers a unique depth that pairs wonderfully with the spices.
How long does homemade eggnog last?
Refrigerated properly, your Creamy Homemade Eggnog will stay fresh for about three days. Beyond that, the texture and flavor can start to degrade, so it’s best enjoyed sooner rather than later.
Can I make this eggnog dairy-free?
You can experiment by using coconut milk and a dairy-free cream alternative, but the texture and traditional flavor will differ significantly. For that classic creamy richness, the combination of heavy cream and milk works best.
Final Thoughts
Creating your own Creamy Homemade Eggnog is one of the most rewarding holiday kitchen projects you can undertake. It fills your home with delightful aromas, warms your heart, and treats your taste buds to a festive celebration like no other. So go ahead, whip up a batch, gather your favorite people, and savor every sip of this classic holiday indulgence. You’re going to love how special and comforting it feels!
PrintCreamy Homemade Eggnog Recipe

This creamy homemade eggnog is a classic holiday favorite made with rich egg yolks, creamy milk and cream, sweetened with pure maple syrup and sugar, and delicately spiced with nutmeg and vanilla. Perfectly smooth and chilled, it’s great served with a splash of brandy or rum and a cinnamon garnish for festive gatherings.
- Prep Time: 15 minutes
- Cook Time: 15 minutes
- Total Time: 4 hours 30 minutes
- Yield: 6 servings 1x
- Category: Beverage
- Method: Tempering and Stove-Top Heating
- Cuisine: American
- Diet: Vegetarian
Ingredients
Egg Mixture
- 8 large egg yolks
- 1/4 cup sugar
- 1/4 cup pure maple syrup
- 2 teaspoons vanilla extract
Dairy Mixture
- 1 cup heavy whipping cream
- 3 cups 2% milk
- 1/2 teaspoon ground nutmeg
To Serve
- Brandy or rum (optional)
- Cinnamon sticks (optional)
- Extra heavy whipping cream (for swirling, optional)
Instructions
- Whisk Egg Yolks and Sugar: In a large bowl, whisk together the 8 large egg yolks and 1/4 cup sugar until smooth and slightly thickened.
- Heat Dairy Mixture: In a medium saucepan over medium heat, combine 1 cup heavy whipping cream, 3 cups 2% milk, 1/4 cup pure maple syrup, 2 teaspoons vanilla, and 1/2 teaspoon ground nutmeg. Heat the mixture to about 165°F (73.8°C), stirring frequently to prevent scorching. Do not allow it to boil.
- Temper the Eggs: Slowly add about half of the heated milk mixture into the egg yolk mixture in a thin stream, whisking constantly to avoid curdling. Then pour the entire egg mixture back into the saucepan with the remaining milk mixture.
- Cook Eggnog: Continue heating the combined mixture until it reaches 165°F (73.8°C) on a cooking thermometer, stirring often. Remove from heat immediately to prevent overcooking.
- Chill the Eggnog: Pour the cooked eggnog into a glass pitcher, cover it with plastic wrap or a lid, and refrigerate until thoroughly chilled, about 4 hours. The eggnog will thicken slightly as it cools.
- Serve: Serve the chilled eggnog in glasses. Optionally add a splash of brandy or rum, a swirl of heavy whipping cream, and garnish with cinnamon sticks or a dash of ground cinnamon for a festive touch.
Notes
- Use a thermometer to ensure the dairy mixture heats to the correct temperature without boiling to prevent curdling.
- Tempering the eggs slowly is crucial to avoid scrambling them.
- For a non-alcoholic version, simply omit the brandy or rum.
- The eggnog can be stored in the refrigerator for up to 3 days.
- Freshly grated nutmeg on top adds extra flavor.
Nutrition
- Serving Size: 1 cup (240 ml)
- Calories: 280
- Sugar: 16 g
- Sodium: 95 mg
- Fat: 18 g
- Saturated Fat: 10 g
- Unsaturated Fat: 6 g
- Trans Fat: 0 g
- Carbohydrates: 20 g
- Fiber: 0 g
- Protein: 6 g
- Cholesterol: 210 mg
Keywords: eggnog, homemade eggnog, holiday drinks, creamy eggnog, festive beverages, traditional eggnog
