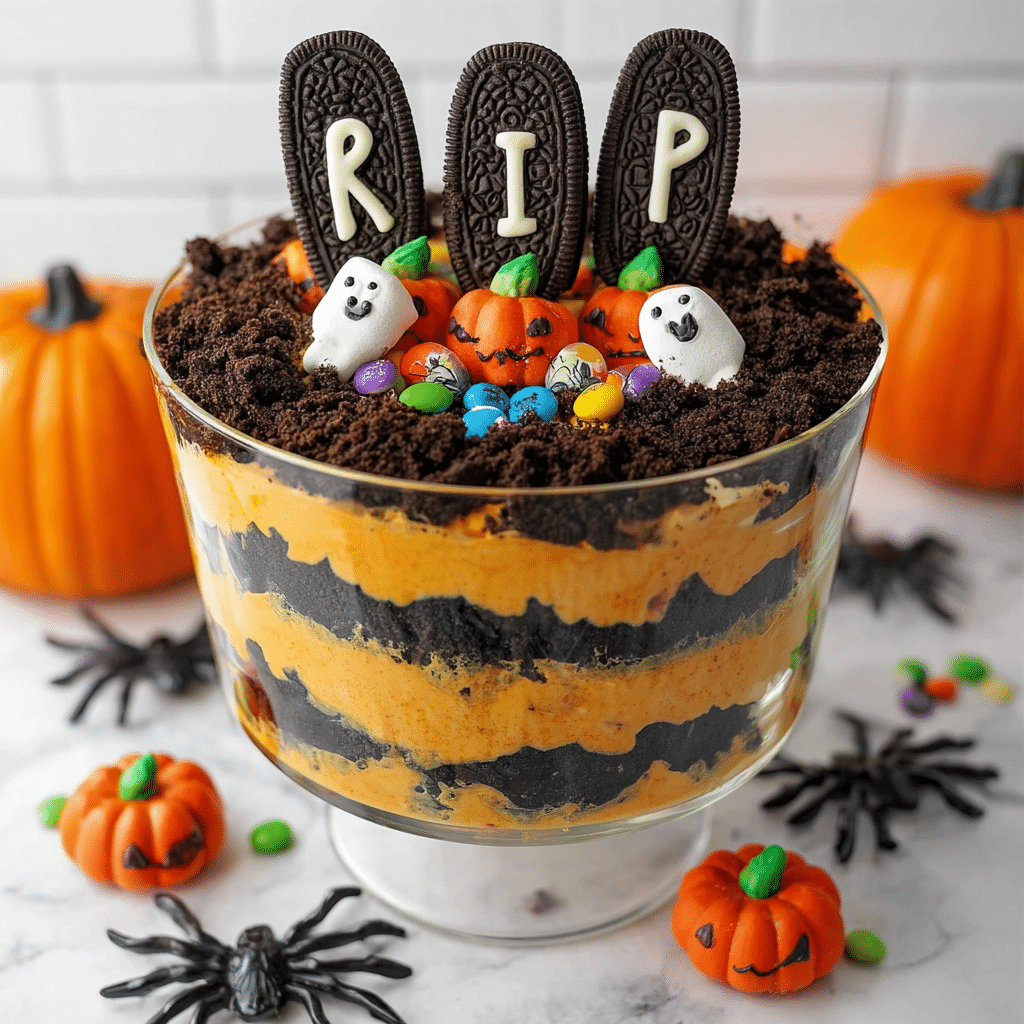
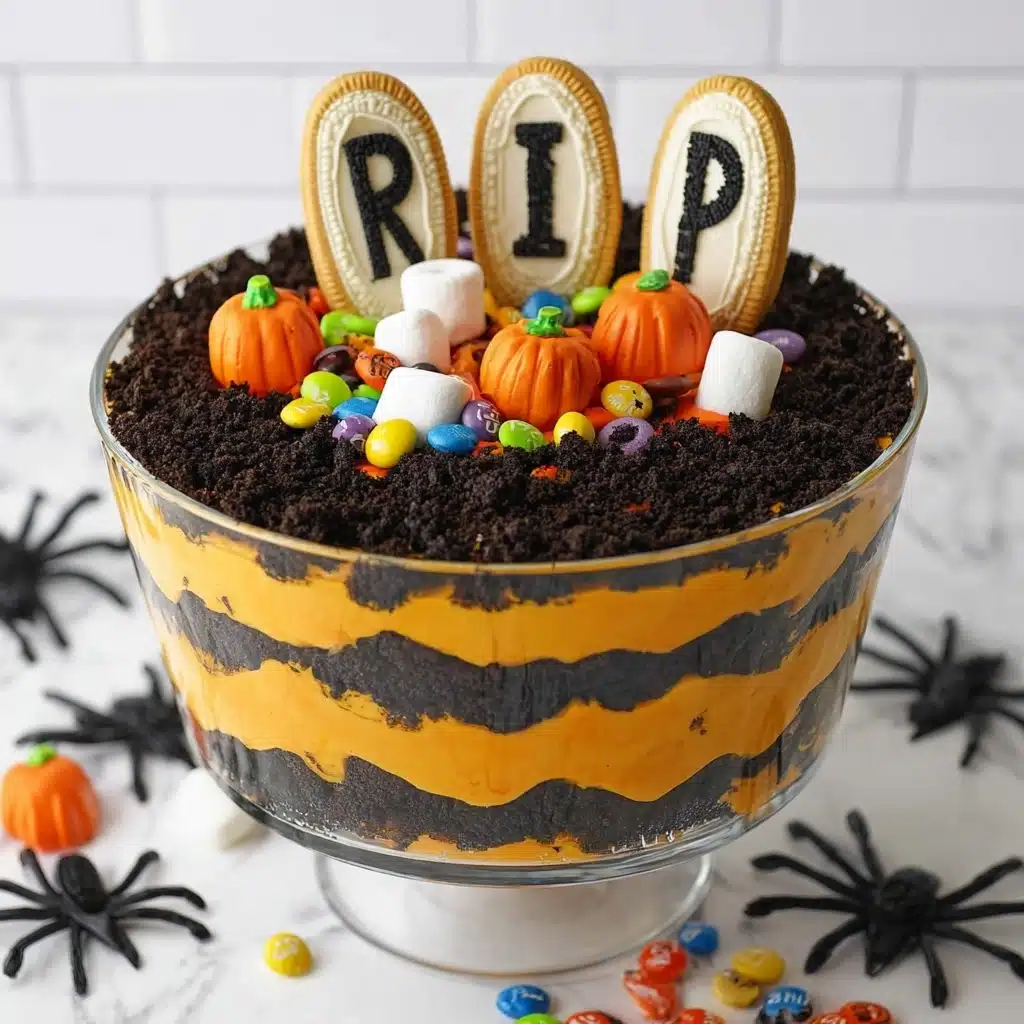
Halloween Trifle Recipe
This spine-tingling Halloween Trifle is the ultimate showstopper for your spooky festivities, layering rich chocolate cake, tangy cheesecake pudding, and color-popping candies all in one stunning dessert. Each bite delivers a collision of creamy, crunchy, and chewy textures, while the playful decorations instantly transform your table into a haunted graveyard scene. Whether you’re hosting a trick-or-treat bash or simply want to wow your family, this delightful treat captures the magic and mischief of Halloween in a single, shareable bowl.
Ingredients You’ll Need
Gathering the right components for this Halloween Trifle is a breeze, and each one plays a pivotal role in crafting the perfect blend of flavors, colors, and textures. From ultra-moist cake to irresistible candy toppings, your masterpiece starts here!
- Chocolate cake mix: Rich, moist, and chocolatey, it forms the delicious base and layers of your trifle.
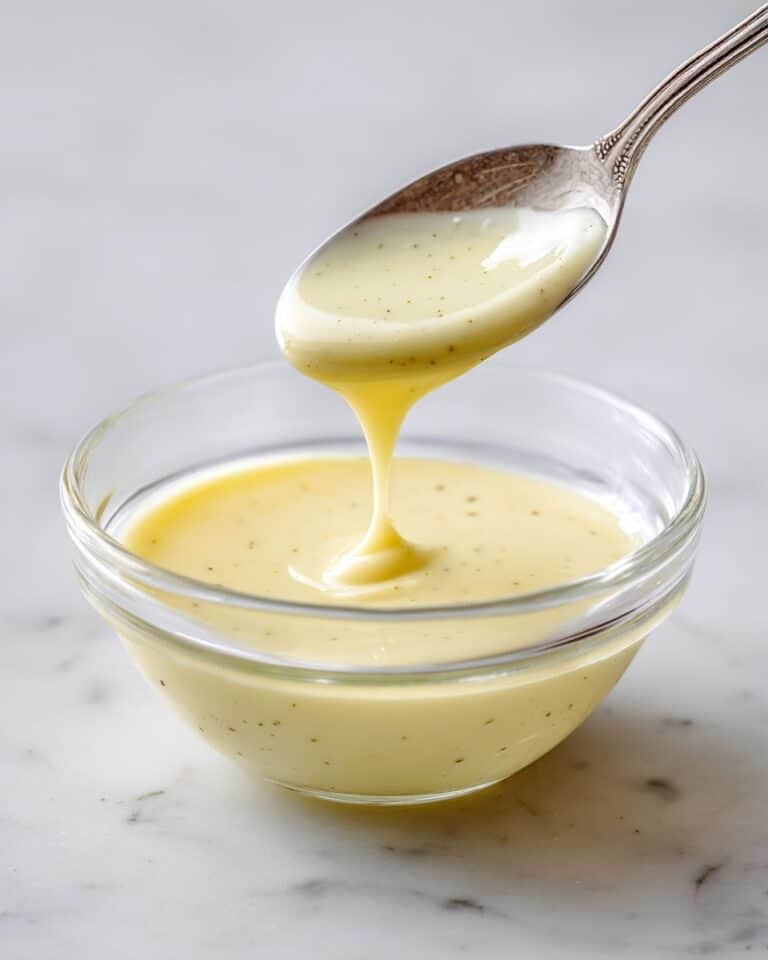
- Cheesecake instant pudding: Adds a creamy, tangy layer that balances out the deep chocolate flavors.
- Cold milk: Essential for whisking up smooth, luscious pudding in minutes.
- Cool Whip (or whipped topping): Gives lightness and airiness to the pudding layer, making it irresistible.
- Oreo cookies: Crushed for that iconic “graveyard dirt” effect and a satisfying cookie crunch.
- Ghost Peeps: These marshmallowy cuties add playful Halloween character as edible decorations.
- Mallowcreme Pumpkins: Soft, sweet pumpkins that introduce festive color and charm.
- Ghoul’s Mix M&M’s: A pop of spooky color and chocolatey crunch on top.
- Milano cookies: Perfect for transforming into edible gravestone headstones with a little icing magic.
- Black gel cookie icing: Easy way to write “RIP” and other spooky messages on your headstones.
- Orange gel food coloring: Brings your pudding to life with that classic Halloween flair.
How to Make Halloween Trifle
Step 1: Bake the Chocolate Cake
Preheat your oven to 350 degrees Fahrenheit and lightly coat two round cake pans with non-stick spray. Prepare the chocolate cake batter according to the package instructions, then divide it between the pans and bake as directed. The aroma of chocolate cake filling your kitchen will instantly set the stage for your Halloween Trifle.
Step 2: Let the Cakes Cool
Once your cakes are baked to perfection, take them out and let them cool completely. This is crucial—if the cake is still warm, it could turn your pudding layer runny later on. Give yourself plenty of time, or speed things up by placing the cakes on a wire rack.
Step 3: Crush the Oreo Cookies
Add Oreo cookies to your food processor and pulse until you have fine, dirt-like crumbs. No food processor? Simply pop them in a large zip-top bag and bash with a rolling pin. Either way, you’ll have a bowl of irresistible chocolate “soil” for your Halloween graveyard.
Step 4: Make the Pudding Layer
In a large bowl, whisk together the cheesecake instant pudding mixes with cold milk until completely smooth. Gently fold in the Cool Whip, then squeeze in a generous dose of orange gel food coloring, whisking until the entire pudding is hauntingly vibrant.
Step 5: Break the Cake Into Chunks
Take your cooled cakes and break them into large, rustic chunks. Don’t stress about making the pieces perfect—this variety gives the trifle beautiful texture and allows the pudding to seep into every crevice.
Step 6: Begin Layering the Halloween Trifle
Start building your masterpiece in a clear trifle bowl. Begin with half the cake pieces, spreading them out evenly across the bottom.
Step 7: Add Oreo Crumbs and Pudding
Sprinkle a third of your Oreo crumbs over the cake, then spoon on half of the orange cheesecake pudding mixture, spreading it gently with a spatula.
Step 8: Repeat the Layers
Layer in the remaining cake pieces, followed by another third of the Oreo crumbs, and finish with the rest of your pudding mixture. Top it all off with the last of your Oreo crumbs to create a convincing layer of edible “graveyard dirt.”
Step 9: Refrigerate and Decorate
Chill your Halloween Trifle in the refrigerator until you’re ready to serve. Just before it hits the party table, transform the top with creative, spooky decorations: make headstones out of Milano cookies (using black gel icing to write “RIP”), and arrange Ghost Peeps, Mallowcreme Pumpkins, and Ghoul’s Mix M&M’s on top for an authentic haunted graveyard effect.
How to Serve Halloween Trifle
Garnishes
The best part about serving Halloween Trifle is getting playful with the garnishes! From marshmallow Peeps ghosts and candy pumpkins to brightly colored M&M’s and hand-crafted gravestone Milano cookies, don’t hesitate to let your imagination roam free. A drizzle of extra black gel icing or even a sprinkle of orange sanding sugar can help you achieve an unforgettable, Instagram-worthy finish.
Side Dishes
Since the trifle is the undoubted star, choose light, palate-cleansing sides. A fruit platter with slices of apple or pear, or a bowl of salty popcorn, pairs beautifully by balancing the richness of your Halloween Trifle. Little cups of spiced cider or hot chocolate also make a fun, cozy addition alongside this dessert.
Creative Ways to Present
Serve your Halloween Trifle in a traditional clear trifle bowl for maximum effect, or get clever with individual mason jars for single servings (perfect for parties or trick-or-treat goody bags!). You can even use small clear cups and let each guest decorate their own spooky trifle top—it’s a fun, interactive way to get everyone involved in the Halloween festivities.
Make Ahead and Storage
Storing Leftovers
If you have leftover Halloween Trifle, cover the bowl tightly with plastic wrap or transfer portions into airtight containers. Store in the refrigerator, where it’ll keep beautifully for up to three days. The flavors mingle even more overnight, making each spoonful just as delicious (if not more!) the next day.
Freezing
Freezing is not recommended for Halloween Trifle, as the texture of the pudding and whipped topping changes significantly with thawing. The candies and garnishes may also become sticky or soggy. For the best experience, enjoy within a few days of assembly.
Reheating
This dessert is meant to be enjoyed chilled or at room temperature, so there’s no need for reheating. If your trifle has been in the fridge for a while and feels a bit too firm, let it sit out for 10 to 15 minutes before serving for the silkiest pudding and softest cake layers.
FAQs
Can I use homemade cake instead of a box mix?
Absolutely! A homemade chocolate cake can bring an extra layer of flavor to your Halloween Trifle. Just make sure it’s baked in a way that you can easily break it into chunks for layering.
Is there a substitute for Cool Whip?
Yes, you can use homemade whipped cream instead of Cool Whip. Simply whip heavy cream with a little powdered sugar until stiff peaks form and fold it into the pudding mixture as you would the Cool Whip.
Can I prepare Halloween Trifle the night before?
Preparing your Halloween Trifle a day ahead is a great idea! In fact, an overnight chill allows the flavors to meld together for an even more decadent taste—just save the candy decorations for just before serving to keep them looking their best.
Are there gluten-free options for this recipe?
Yes! Use your favorite gluten-free chocolate cake mix and gluten-free sandwich cookies in place of the Oreos. Double-check your candy decorations for gluten as well, and your Halloween Trifle will be ready for all guests to enjoy.
Can I add other Halloween candies?
Definitely! Feel free to customize your Halloween Trifle with gummy worms, candy corn, or chocolate eyeballs—whatever makes your graveyard scene extra creepy and fun. It’s a dessert built for creativity.
Final Thoughts
If you’re looking for a festive dessert that elicits gasps and grins in equal measure, this Halloween Trifle is the ultimate treat. Grab your favorite spooky candies and whip up this easy, crowd-pleasing centerpiece for your Halloween celebration—you’ll have everyone coming back for seconds (and snapping plenty of photos)!
PrintHalloween Trifle Recipe

Celebrate Halloween with this spooky and delicious Halloween Trifle, featuring layers of chocolate cake, cheesecake pudding, whipped topping, and fun Halloween-themed decorations. Perfect for a festive dessert!
- Prep Time: 30 minutes
- Cook Time: 30 minutes
- Total Time: 1 hour
- Yield: 12 servings 1x
- Category: Dessert
- Method: Baking, Mixing
- Cuisine: American
- Diet: Vegetarian
Ingredients
For the Cake:
- 1 box of chocolate cake mix, plus the ingredients from the back (water, oil, eggs)
For the Pudding Layer:
- 2 (3.4 oz.) boxes of cheesecake instant pudding
- 3 cups of cold milk
- 8 ounces cool whip (or other whipped topping)
- 30 Oreo cookies
For Decoration:
- Ghost peeps
- Mallowcreme Pumpkins
- Ghoul’s Mix M&M’s
- Milano cookies
- Black gel cookie icing
- Orange gel food coloring
Instructions
- Preheat the Oven: Preheat your oven to 350 degrees Fahrenheit and spray two round cake pans with non-stick spray.
- Prepare the Cake: Prepare the cake batter according to the box directions, then bake in the round pans.
- Cool the Cake: Let the cakes cool completely.
- Crush the Oreos: Crush Oreo cookies into fine crumbs.
- Prepare the Pudding: Whisk together pudding mixes and milk, then add cool whip and orange gel food coloring.
- Assemble Trifle: Break the cakes into chunks and layer with crushed Oreos and pudding mixture in a trifle bowl.
- Add Final Touches: Top with remaining Oreo crumbs, decorate with Milano cookies and Halloween-themed candies.
- Chill and Serve: Refrigerate the trifle until ready to serve.
Notes
- For an extra spooky touch, you can add gummy worms or other Halloween candies to the trifle layers.
- Feel free to get creative with the decorations and personalize your trifle to match your Halloween theme.
Nutrition
- Serving Size: 1 serving
- Calories: 320
- Sugar: 25g
- Sodium: 380mg
- Fat: 14g
- Saturated Fat: 6g
- Unsaturated Fat: 6g
- Trans Fat: 0g
- Carbohydrates: 45g
- Fiber: 2g
- Protein: 4g
- Cholesterol: 25mg
Keywords: Halloween, Trifle, Dessert, Chocolate, Pudding, Whip Topping, Spooky, Fun

