Homemade Pistachio Ice Cream Recipe
Introduction
Enjoy the rich, nutty flavor of homemade pistachio ice cream with this simple recipe. Made from roasted pistachios and a creamy custard base, it’s a delightful treat perfect for any season.
Ingredients
- 1 & 1/2 cups whole milk
- 1 & 1/2 cups heavy cream
- ⅔ cup granulated sugar
- 4 large egg yolks
- 1 cup shelled, unsalted pistachios (roasted, unsalted)
- ½ tsp vanilla extract
- Pinch of salt
- ¼ to ⅓ cup pistachio cream (pistachio paste or crema di pistacchio)
Instructions
- Step 1: Add the pistachios to a food processor and blend until a thick, creamy paste forms, about 2–4 minutes. Scrape down the sides as needed.
- Step 2: In a medium saucepan, combine the pistachio paste, milk, cream, and half the sugar.
- Step 3: Whisk over medium heat until fully combined and steaming, but do not boil. Use an immersion blender if needed to dissolve the paste.
- Step 4: In a separate bowl, whisk together egg yolks, remaining sugar, and salt until pale and slightly thickened.
- Step 5: Slowly drizzle the hot pistachio mixture into the egg yolks while whisking to temper them. Then return everything to the saucepan.
- Step 6: Cook over medium heat, stirring constantly, until the mixture thickens and coats the back of a spoon (170–175°F / 77–80°C).
- Step 7: Remove from heat and stir in vanilla extract.
- Step 8: Optional: strain the base through a fine mesh sieve for a smoother texture.
- Step 9: Let the base cool to room temperature, then cover and chill in the refrigerator for at least 4 hours or overnight.
- Step 10: Once chilled, churn the base in an ice cream maker according to manufacturer instructions until soft-serve texture is reached (usually 20–25 minutes).
- Step 11: Layer half of the churned ice cream into a storage container.
- Step 12: Drizzle spoonfuls of pistachio cream over the ice cream and gently swirl with a knife.
- Step 13: Repeat with remaining ice cream and more pistachio cream.
- Step 14: Freeze the ice cream for at least 4 hours until firm and scoopable.
Tips & Variations
- Use roasted, unsalted pistachios for the best flavor and texture in your ice cream.
- For a smoother ice cream, be sure to strain the custard base before chilling.
- Replace pistachio cream with chocolate or caramel sauce for a different swirl flavor.
Storage
Store the pistachio ice cream in an airtight container in the freezer for up to 2 weeks. To serve, let it sit at room temperature for 5–10 minutes to soften slightly for easy scooping.
How to Serve
Serve this delicious recipe with your favorite sides.
FAQs
Can I make this recipe without an ice cream maker?
Yes, you can freeze the custard in a shallow container and stir every 30 minutes to break up ice crystals until smooth and creamy, but an ice cream maker gives the best texture.
Is it necessary to temper the egg yolks?
Yes, tempering the egg yolks prevents them from curdling when added to the hot mixture, ensuring a smooth and creamy custard base.
PrintHomemade Pistachio Ice Cream Recipe

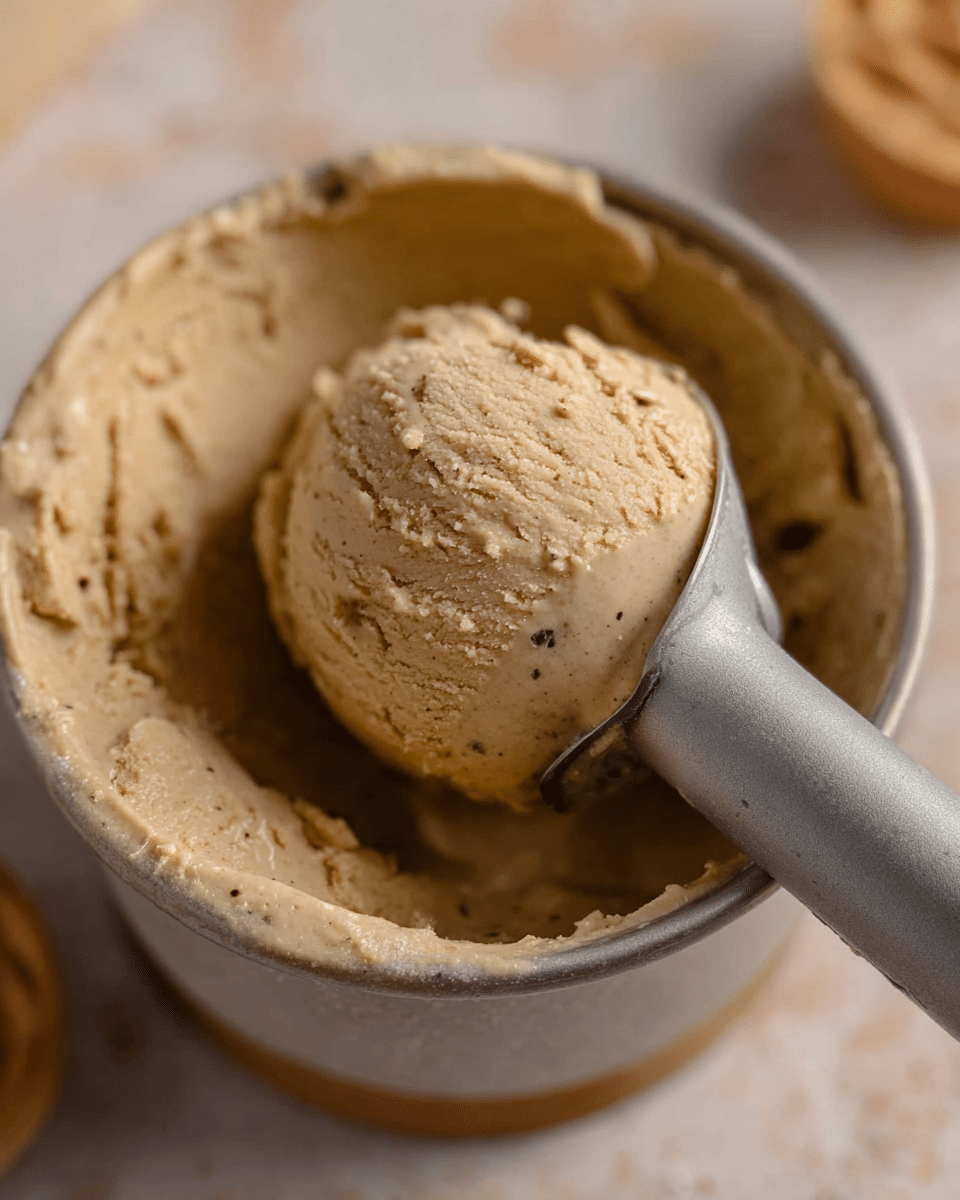
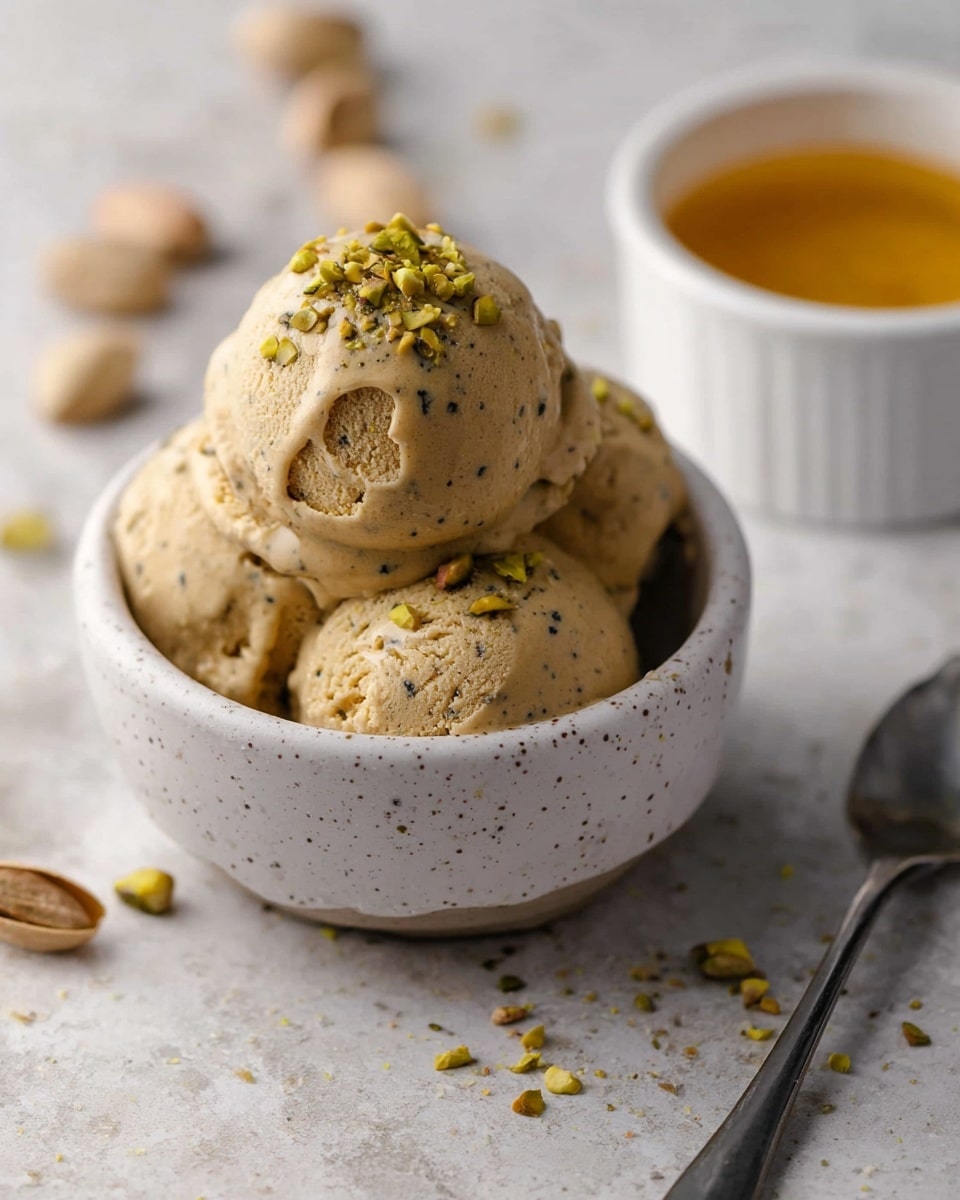
This homemade pistachio ice cream recipe offers a rich and creamy dessert bursting with authentic pistachio flavor. Using roasted and unsalted pistachios blended into a smooth paste combined with a custard base, this ice cream is churned to soft-serve perfection and layered with a luxurious pistachio cream swirl for added depth and indulgence.
- Prep Time: 20 minutes
- Cook Time: 15 minutes
- Total Time: 8 hours 35 minutes
- Yield: About 1 quart (4 cups) of ice cream 1x
- Category: Dessert
- Method: Stovetop
- Cuisine: Italian-inspired
- Diet: Vegetarian
Ingredients
Ice Cream Base
- 1 & 1/2 cups whole milk
- 1 & 1/2 cups heavy cream
- ⅔ cup granulated sugar, divided
- 4 large egg yolks
- 1 cup shelled, unsalted roasted pistachios
- ½ tsp vanilla extract
- Pinch of salt
Pistachio Cream Swirl
- ¼ to ⅓ cup pistachio cream (pistachio paste or crema di pistacchio, thick and sweetened)
Instructions
- Make Pistachio Paste: Add the roasted, unsalted shelled pistachios to a food processor and blend continuously for 2 to 4 minutes, scraping down the sides as needed, until a thick, creamy paste forms similar to nut butter. This paste is key for the rich pistachio flavor.
- Heat Dairy and Sugar: In a medium saucepan, combine the pistachio paste, whole milk, heavy cream, and half of the granulated sugar. Whisk over medium heat until the mixture is fully combined and steaming, but do not let it boil. An immersion blender can be used here if needed to dissolve the pistachio paste completely.
- Prepare Egg Mixture: In a separate bowl, vigorously whisk together the egg yolks, remaining sugar, and a pinch of salt until the mixture becomes pale and slightly thickened.
- Temper the Eggs: Slowly drizzle the hot pistachio milk mixture into the egg yolks while whisking constantly to temper them and prevent curdling. Once combined, return everything to the saucepan.
- Cook Custard: Over medium heat, stir the mixture constantly with a rubber spatula until it thickens enough to coat the back of a spoon, reaching 170–175°F (77–80°C). Avoid boiling.
- Add Vanilla: Remove the saucepan from heat and stir in the vanilla extract for added aroma and depth.
- Optional Straining: For an ultra-smooth base, strain the custard through a fine mesh sieve to remove any lumps or larger pistachio bits.
- Chill Base: Allow the custard base to cool to room temperature, then cover and refrigerate for at least 4 hours or overnight to fully chill and develop flavors.
- Churn Ice Cream: Pour the chilled custard into an ice cream maker and churn according to manufacturer instructions, typically for 20 to 25 minutes, until the ice cream reaches a soft-serve consistency.
- Layer with Pistachio Cream: Transfer half of the churned ice cream into a storage container. Spoon and drizzle some pistachio cream over this layer and use a knife to gently swirl it in.
- Repeat Layering: Add the remaining ice cream on top, drizzle with more pistachio cream, and swirl again to create marbled flavor throughout.
- Freeze Firm: Place the container in the freezer for at least 4 hours or until the ice cream is firm and scoopable. Serve and enjoy the rich, nutty pistachio treat.
Notes
- Roasting and using unsalted pistachios enhances the flavor and ensures the right salt balance in the ice cream.
- Tempering the egg yolks is crucial to avoid scrambling and to achieve a smooth custard base.
- Using pistachio cream in layering adds richness and an extra pistachio punch, but you can adjust quantity to taste.
- Chilling the base overnight improves texture and flavor development.
- If you don’t have a food processor, a high-power blender can be used for the pistachio paste but may require more blending time.
- The custard base can be stored in the refrigerator for up to 24 hours before churning.
Keywords: pistachio ice cream, homemade ice cream, pistachio paste, pistachio cream, creamy dessert, custard ice cream
