Hostess Cupcake Layer Cake Recipe
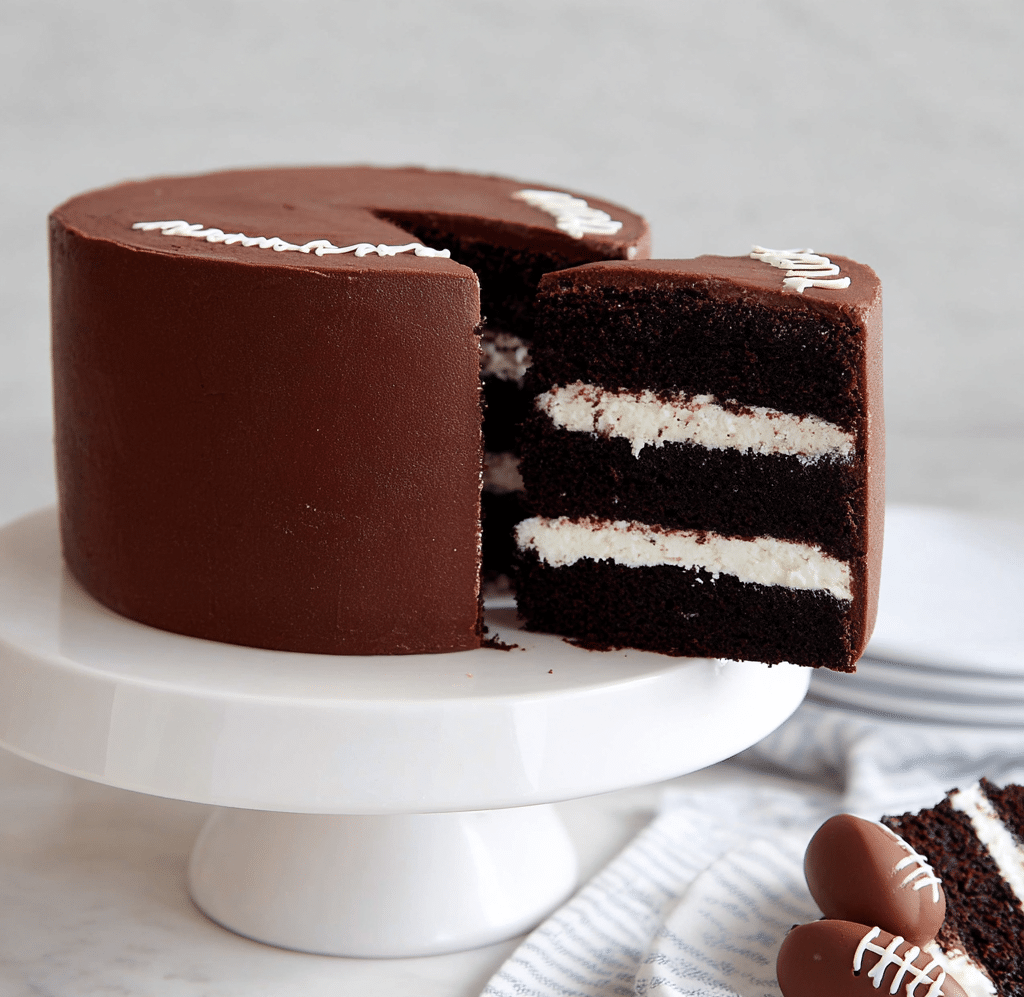
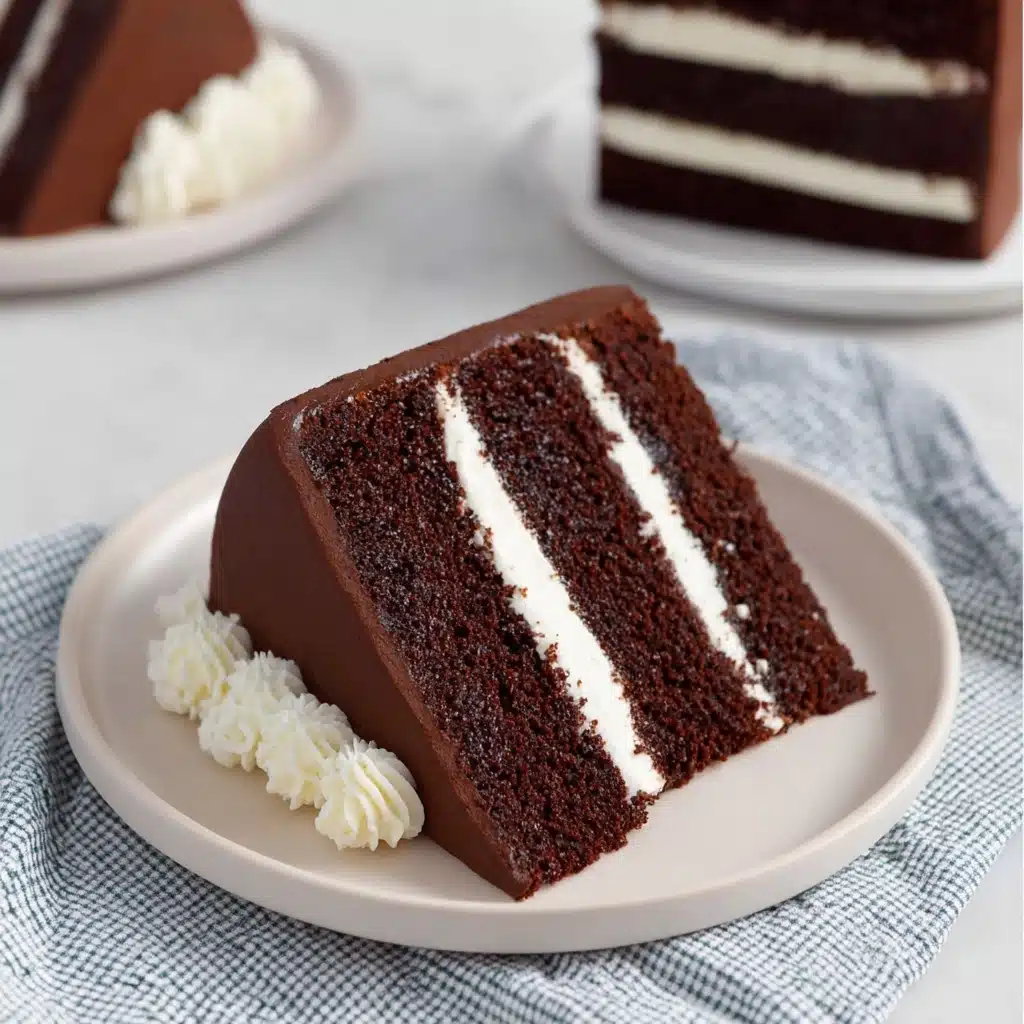
Your dessert dreams are about to come true with this irresistible Hostess Cupcake Layer Cake. Imagine the nostalgic charm of the classic Hostess Cupcake, transformed into a multi-layered spectacle of moist chocolate cake layered with fluffy marshmallow cream and coated in a whipped chocolate ganache that melts in your mouth. This showstopper combines deep cocoa richness, light and airy frosting, and that signature marshmallow center that brings all the magic together. Trust me, once you take a bite of this Hostess Cupcake Layer Cake, it will quickly become your new favorite celebration treat to share with friends and family.
Ingredients You’ll Need
These ingredients are surprisingly simple yet come together beautifully to create the rich flavor, decadent texture, and classic look of the cake. Each one plays a vital role, from the fluffy cake crumb to the velvety ganache and marshmallow filling that make this layer cake unforgettable.
- All-purpose flour (2 Cups, 265g): The foundation for your tender and sturdy cake layers that will hold up perfectly to the filling and frosting.
- Granulated sugar (1 2/3 Cups, 340g): Sweetens the cake while aiding in moisture retention for maximum softness.
- Natural unsweetened cocoa powder (2/3 Cup, 60g): Adds rich chocolate flavor and beautiful deep color.
- Baking soda (2 tsp) and baking powder (1 tsp): The dynamic duo that guarantees your cake rises beautifully and stays light.
- Salt (1/2 tsp): Balances the sweetness and enhances the chocolate notes.
- Vegetable oil (1/2 Cup, 120ml): Keeps the cake incredibly moist and tender.
- Large eggs (2, room temperature): Help bind the cake while contributing to its structure and richness.
- Pure vanilla extract (1 1/2 tsp): Adds warm, aromatic depth to the chocolate.
- Buttermilk (1 Cup, 240ml, room temperature): Tenderizes the crumb and adds a gentle tang; you can make a quick DIY buttermilk if needed.
- Hot coffee or water (1 Cup, 240ml): Amplifies the chocolate flavor superbly without overpowering.
- Semi-sweet chocolate chips (2 Cups, 370g): Integral for the luscious whipped ganache frosting that coats the cake.
- Heavy whipping cream (2 Cups, 480ml): Whisked into chocolate to create the fluffy ganache with incredible richness.
- Unsalted butter (1/2 Cup, 113g, room temperature): Creamy base for the marshmallow fluff filling.
- Powdered sugar (1 Cup, 105g): Sweetens and stabilizes the marshmallow cream filling.
- Marshmallow fluff (7 Oz): The signature sweet cloud-like filling that mimics the classic Hostess cupcake center.
- Pure vanilla extract (1 tsp): Adds extra flavor magic to the fluffy filling.
How to Make Hostess Cupcake Layer Cake
Step 1: Bake the Chocolate Cake Layers
Start by preheating your oven to 350ºF and prepping your cake pans with non-stick spray and parchment paper to ensure an easy release. Combine all your dry ingredients first to evenly distribute the leavening agents and cocoa powder, then gently add the wet ingredients for a silky batter. The trick is to add your hot coffee slowly; it brings out the deepest flavors in the cocoa without compromising the batter’s delicate texture. Pour the thin batter into the pans and bake for around 32 to 36 minutes until a toothpick comes out clean. Cooling them fully before frosting is essential to keep everything neat and delicious.
Step 2: Whipped Chocolate Ganache
This whipped ganache is what transforms your simple chocolate chips into a cloud of creamy frosting. Heat the cream just until it starts to simmer—bubbles gently forming at the edges—then pour it over the chocolate chips. Let it sit quietly for a couple of minutes before whisking it until silky smooth. Chill it until it thickens to a peanut butter-like consistency, then whip it until it lightens in color and you can hold perfect peaks. This ganache provides the perfect balance of richness without heaviness, giving the cake an elegant finish and plenty of frosting for every bite.
Step 3: Marshmallow Cream Filling
The marshmallow fluff filling is the secret hero of your Hostess Cupcake Layer Cake’s nostalgic charm. Start by whipping softened butter until it’s light and creamy, then add powdered sugar gradually to build structure. Folding in the marshmallow fluff with a touch of vanilla creates a fluffy, sweet, and irresistibly smooth filling that brings that classic cream center to life. It’s soft enough to spread easily and firm enough to hold its shape between your cake layers.
Step 4: Assemble Your Cake Layers
Once your cake layers have cooled, level and torte them to create even layers perfect for stacking. Pipe a ring of whipped chocolate ganache around each cake layer’s edge and fill the center with half the marshmallow cream filling for a luscious contrast of textures. Layer carefully and finish with a crumb coat of ganache before chilling. After the ganache firms up, smooth on the remaining frosting for a sleek finish. Don’t forget to use the reserved marshmallow cream to pipe the delightful overlapping loops on top, mimicking the iconic detail of the Hostess cupcake look with a modern, handcrafted touch.
How to Serve Hostess Cupcake Layer Cake
Garnishes
Finish your Hostess Cupcake Layer Cake with a few fun garnishes to elevate the experience. Consider sprinkling mini chocolate chips or crushed graham crackers on top to add texture and a hint of crunch. A light dusting of cocoa powder or edible gold dust can also bring a lovely shimmer and elegance, making this cake truly party-ready. Adding some fresh berries on the side can provide a bright contrast to all that rich chocolate and sweetness.
Side Dishes
Though this cake is a showstopper on its own, pairing it with light accompaniments can balance the indulgence. Serve alongside a simple vanilla bean ice cream or a scoop of salted caramel gelato. For a beverage, a cold glass of milk or a freshly brewed cup of coffee brings out the chocolate’s complexity and complements the marshmallow cream perfectly. If you want to keep it classic, a hot chocolate with whipped cream will double down on the cozy satisfaction.
Creative Ways to Present
Want to wow your guests? Serve slices of the Hostess Cupcake Layer Cake on chic dessert plates topped with a drizzle of chocolate sauce or a dollop of whipped cream. You can also cut the cake into small squares for a dessert buffet or assemble individual mini trifle cups layering cake crumbs, marshmallow cream, and ganache for an interactive, deconstructed twist. Presentation is all about highlighting those beautiful frosting loops and the cake’s luscious layers, so don’t be shy to get creative and playful!
Make Ahead and Storage
Storing Leftovers
Leftover Hostess Cupcake Layer Cake can be stored covered in the refrigerator for up to 4 days. Make sure to keep it airtight by using a cake dome or wrapping it tightly with plastic wrap to avoid drying out the frosting and cake. When you’re ready to indulge again, simply bring it to room temperature for about 30 minutes to enjoy the frosting’s perfect texture and the cake’s moist crumb.
Freezing
This cake freezes beautifully and can be saved for special occasions. Wrap it securely in plastic wrap, then cover with foil or place it in an airtight container to prevent freezer burn. Freeze for up to 3 months. When you want to serve it, thaw it overnight in the refrigerator, then let it sit at room temperature before serving to restore the ideal softness and flavor balance.
Reheating
Since this is a chocolate layer cake with whipped frosting and marshmallow filling, reheating isn’t recommended as it can affect texture. Instead, simply allow refrigerated or thawed cake slices to come to room temperature before serving. If you prefer your cake slightly warm, a brief 10-15 second zap in the microwave can soften the ganache, but watch carefully to avoid melting the marshmallow filling.
FAQs
Can I use regular milk instead of buttermilk?
You can substitute regular milk mixed with 1 tablespoon of lemon juice or vinegar per cup and let it sit for 5-10 minutes to create a DIY buttermilk that works perfectly for this recipe.
Can I make this cake in larger pans?
Yes! If using 8-inch pans, you might only need two layers instead of three. Adjust the baking time accordingly, checking for doneness with a toothpick starting around 30 minutes.
Is it possible to use a hand mixer instead of a stand mixer?
Absolutely. A hand mixer will do the job well for whipping the ganache, marshmallow filling, and mixing the batter. Just be mindful of mixing times to avoid over or under mixing.
Can I prepare this cake a day in advance?
Yes, this cake actually benefits from sitting overnight in the fridge, allowing the flavors to meld and the frosting to set beautifully for easier slicing and serving.
What is the best way to level and torte cake layers?
Use a serrated knife or a cake leveler. Trim the domed top of each layer so they stack evenly, then slice each layer horizontally if you want thinner tiers. This ensures your Hostess Cupcake Layer Cake looks professional and stays stable.
Final Thoughts
Making this Hostess Cupcake Layer Cake is like giving yourself a slice of nostalgic happiness with a luxurious, grown-up twist. It’s a recipe that brings joy both in the baking and the eating, and offers an impressive yet approachable dessert for any occasion. I can’t wait for you to try it and find out just how magical chocolate, marshmallow, and whipped ganache can be together. Happy baking and even happier indulging!
PrintHostess Cupcake Layer Cake Recipe
This Hostess Cupcake Layer Cake is a decadent, multi-layered chocolate cake inspired by the classic chocolate cupcake with creamy marshmallow filling and a light whipped chocolate ganache frosting. Moist chocolate layers are perfectly balanced with fluffy marshmallow cream filling and topped with a smooth, whipped ganache for a show-stopping dessert.
- Prep Time: 20 minutes
- Cook Time: 35 minutes
- Total Time: 2 hours 15 minutes
- Yield: 12 servings 1x
- Category: Dessert, Cake
- Method: Baking, Whipping, Assembling
- Cuisine: American
- Diet: Vegetarian
Ingredients
Dry Ingredients
- 2 Cups (265g) all purpose flour
- 1 2/3 Cups (340g) granulated sugar
- 2/3 Cup (60g) natural unsweetened cocoa powder
- 2 tsp baking soda
- 1 tsp baking powder
- 1/2 tsp salt
Wet Ingredients
- 1/2 Cup (120ml) vegetable oil
- 2 large eggs, room temperature
- 1 1/2 tsp pure vanilla extract
- 1 Cup (240ml) buttermilk, room temperature*
- 1 Cup (240ml) hot coffee or hot water
Ganache
- 2 Cups (16oz, 370g) semi-sweet chocolate chips
- 2 Cups (16oz, 480ml) heavy whipping cream
Marshmallow Cream Filling
- 1/2 Cup (113g) unsalted butter, room temperature
- 1 Cup (105g) powdered sugar
- 7 Oz marshmallow fluff
- 1 tsp pure vanilla extract
Instructions
- Make the Chocolate Cake: Preheat the oven to 350ºF and prepare your cake pans by spraying with cooking spray and lining the bottom with parchment paper. Combine all dry ingredients in a stand mixer bowl and stir on low for 30 seconds. Add vegetable oil, eggs, vanilla, and buttermilk and mix on low until just combined. Slowly add hot coffee while mixing on low until fully incorporated, about 1 minute. The batter will be thin.
- Bake the Cake: Pour the batter evenly into the prepared pans and bake for 32-36 minutes, or until a toothpick inserted in the center comes out clean. Let cakes cool completely before frosting.
- Make the Whipped Chocolate Ganache: Place chocolate chips in a heatproof bowl. Heat heavy cream on medium-high heat until it just starts to simmer, then pour over the chocolate. Cover with a plate and let sit for 2 minutes. Whisk until smooth and uniform. Cover with plastic wrap and refrigerate until room temperature, about 1-2 hours.
- Whip the Ganache: Once the ganache has thickened to about the consistency of smooth peanut butter, whip it on medium-high speed until it lightens in color and holds peaks similar to buttercream, approximately 2-3 minutes.
- Make the Marshmallow Cream Filling: In a stand mixer bowl, whip butter on high speed until smooth and creamy, about 5 minutes. Add powdered sugar on low speed until combined. Add marshmallow fluff and vanilla extract and mix on low until combined and smooth, about 1-2 minutes.
- Assemble the Cake: Level and torte cake layers to desired height. Reserve 2 tablespoons of marshmallow cream for piping. Fit a piping bag with a 1/2 inch opening and fill with 1 cup of whipped ganache. Place first layer on a turntable, pipe a ganache circle around edge, and fill center with half the marshmallow cream. Repeat with second layer. Place final layer upside down to make the bottom the cake top. Crumb coat with ganache and refrigerate for at least 20 minutes.
- Finish the Frosting: Smoothly frost the cake with remaining whipped ganache using an icing smoother. Refrigerate for 10 minutes to set.
- Decorate: Fill a piping bag fitted with Wilton Tip 3 with the reserved marshmallow cream. Pipe a continuous series of overlapping loops across the top of the cake starting from one edge to the opposite edge to create a decorative finish.
Notes
- *DIY Buttermilk: Combine 1 cup milk with 1 tablespoon lemon juice or white vinegar, let sit for 5 minutes before using.
- Use room temperature eggs and buttermilk for best batter consistency.
- When baking, rotate pans halfway for even baking.
- Allow cakes to cool completely to prevent ganache from melting.
- Ganache consistency depends on bowl depth; shallower containers chill faster.
- Use an icing smoother for professional finish.
Nutrition
- Serving Size: 1 slice (1/12 of cake)
- Calories: 520
- Sugar: 39g
- Sodium: 210mg
- Fat: 32g
- Saturated Fat: 18g
- Unsaturated Fat: 12g
- Trans Fat: 0.5g
- Carbohydrates: 55g
- Fiber: 4g
- Protein: 6g
- Cholesterol: 80mg
Keywords: chocolate cake, Hostess cupcake, whipped ganache, marshmallow cream filling, layered cake, dessert, homemade cake
