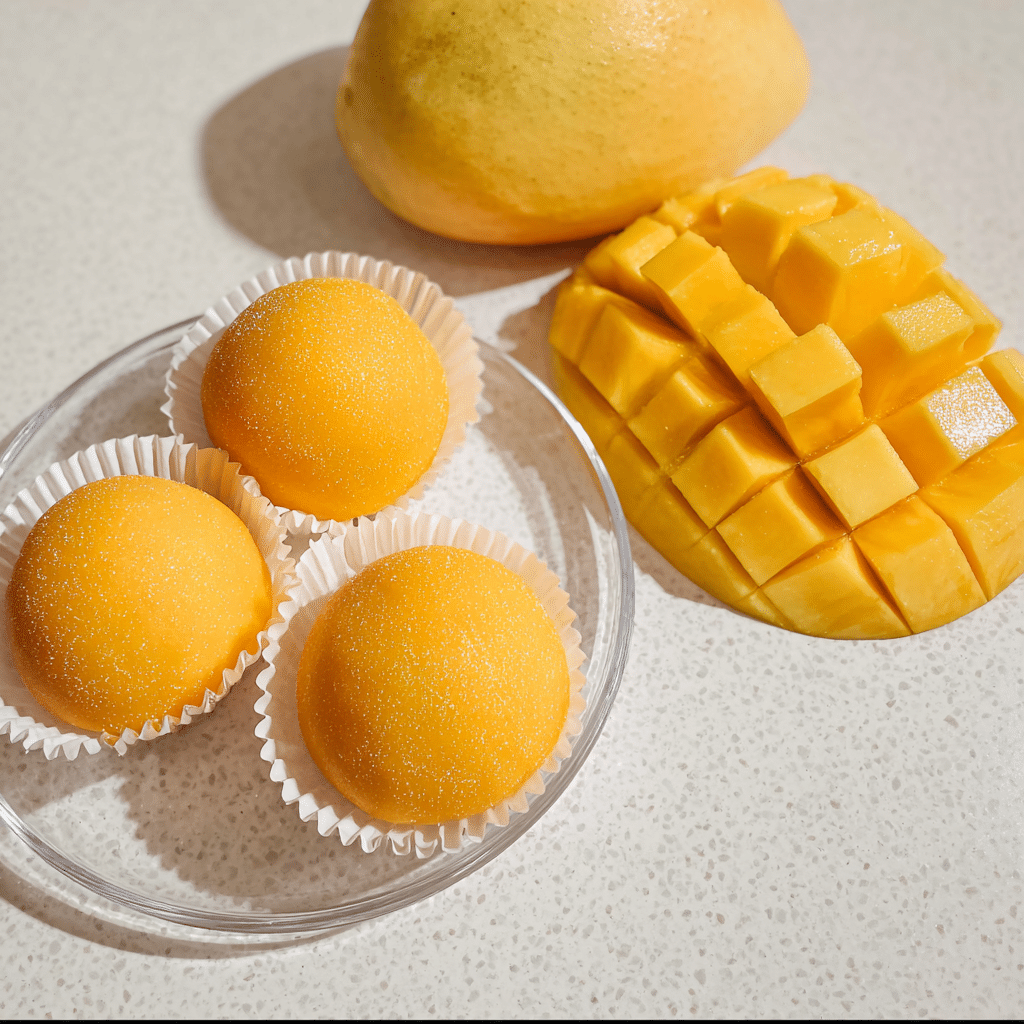
Mango Mochi Recipe
If you have a sweet tooth and love trying delightful treats, then you absolutely need to discover the joy of Mango Mochi. This chewy, pillowy dessert combines the tropical burst of fresh mango with the uniquely satisfying texture of glutinous rice mochi. Every bite offers a luscious blend of creamy whipped cream and juicy mango cubes wrapped in a subtly sweet mochi skin that is as fun to make as it is to eat. Whether you are looking for a refreshing afternoon snack or a crowd-pleasing dessert, the Mango Mochi will quickly become a beloved favorite you’ll want to share with everyone around you.
Ingredients You’ll Need
Preparing Mango Mochi is surprisingly straightforward, thanks to a handful of carefully chosen ingredients that bring out its flavor and texture. Each component plays a special role, from the glutinous rice flour that gives mochi its signature chew, to the vibrant mango that adds a fresh, sunny sweetness.
- Glutinous rice flour (200g / 1 ½ cup): The key to that soft and stretchy mochi texture everyone loves.
- Granulated sugar (65g / ⅓ cup + 40g / 3 tbsp): Adds just the right amount of sweetness to both the dough and whipped cream.
- Corn starch (40g / ⅓ cup, plus extra for dusting): Prevents sticking and helps achieve a smooth mochi surface.
- Whole milk (360ml / 1 ½ cup): Keeps the mochi tender and moist with a rich flavor.
- Yellow food coloring (one small drop): Gives the mochi a lovely, inviting hue reminiscent of ripe mangoes.
- Vegetable oil (1 ½ tbsp): Ensures the dough doesn’t stick to your hands, making kneading easier.
- Thickened cream (350g / 1 ½ cup): Whipped into perfection to add a creamy lightness inside each mochi.
- Fresh mangoes (2 large, cubed): Bursting with tropical sweetness that defines this recipe.
How to Make Mango Mochi
Step 1: Preparing the Mochi Dough
Start by combining the glutinous rice flour, sugar, and cornstarch in a microwave-safe bowl. Whisk these dry ingredients well to ensure even sweetness and texture throughout the mochi dough. Slowly whisk in the whole milk along with a tiny drop of yellow food coloring to give a gentle mango-inspired tint. Make sure the mixture is smooth and free of lumps before moving on.
Step 2: Microwaving the Mochi
Cover your bowl with cling wrap and microwave on high for 2 minutes. After this, remove the cover and give the mixture a good stir, then re-cover and microwave for another 2 minutes. The mochi should start turning semi-translucent, signaling it’s almost cooked. If it still looks too liquidy, continue microwaving in 1-minute increments until the dough solidifies. This step is crucial for achieving that perfect chew.
Step 3: Kneading and Dividing the Dough
Once cooked, allow the mochi dough to cool enough to handle safely. Add in the vegetable oil to keep your hands from sticking, and knead the dough until smooth and elastic. Prepare a baking tray lined with parchment paper, then divide the dough into 6 equal portions. These will become your individual mochi bases.
Step 4: Whipping the Cream
While the dough rests, whip the thickened cream and granulated sugar together until stiff peaks form. This luscious whipped cream will become the delightful filling, adding a light and creamy contrast to the chewy mochi. Transfer the whipped cream to a piping bag and chill it in the fridge for easy assembly.
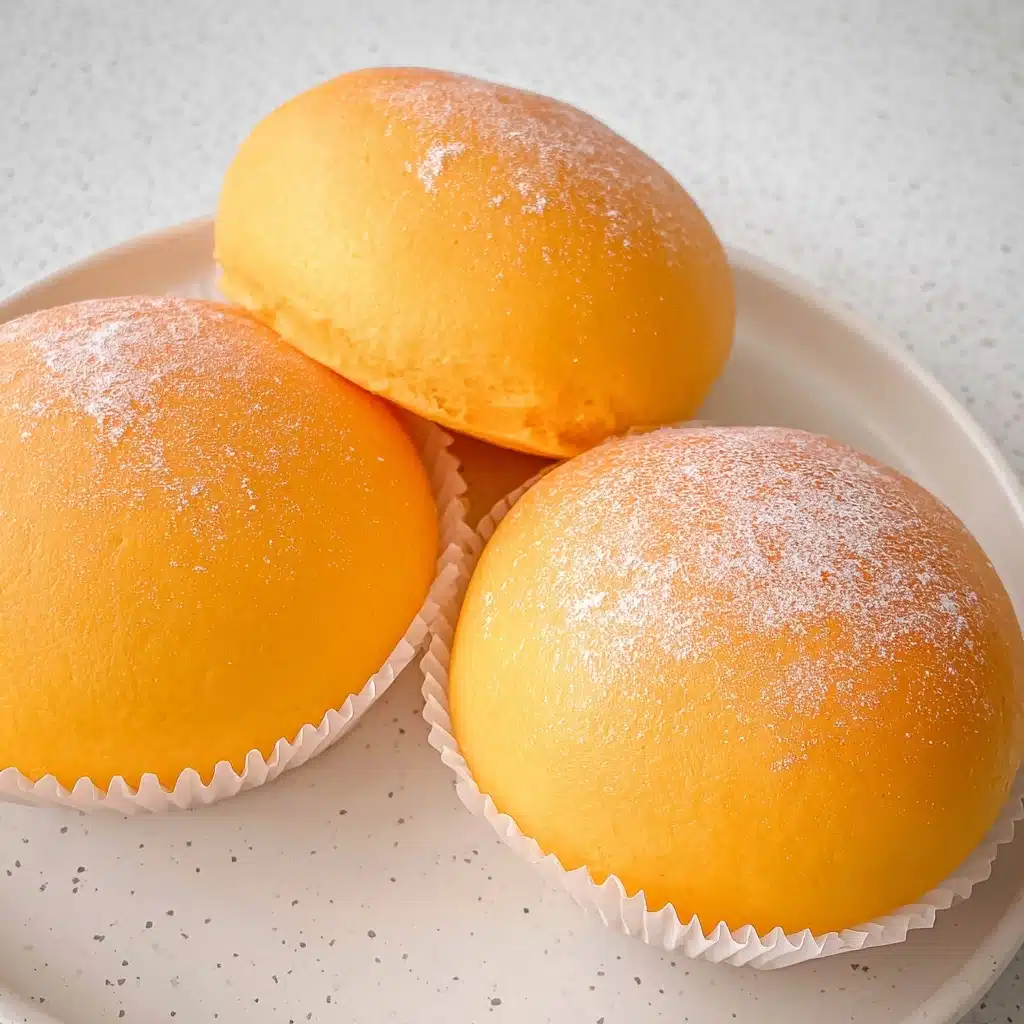
Step 5: Assembling the Mango Mochi
Dust your work surface generously with cornstarch. Roll each mochi portion into a ball, then dust again and flatten into a circle. Using a small bowl, you’ll invert the mochi skin into it, pipe a swirl of chilled whipped cream in the center, and top it with a juicy cube of mango. Carefully lift the edges of the mochi to enclose the filling, trimming off the excess with scissors to seal it nicely. A good dusting of cornstarch will keep things from sticking. Flip the bowl over and lift it to reveal your perfectly shaped Mango Mochi. Repeat until all portions are assembled.
How to Serve Mango Mochi
Garnishes
A simple dusting of cornstarch keeps the mochi from sticking to your fingers and plate, but for an extra touch, try dusting with finely shredded coconut or a sprinkle of matcha powder for a visual and flavor contrast. A small mint leaf atop each mochi adds a pop of color and a refreshing hint that pairs beautifully with mango.
Side Dishes
Mango Mochi shines best as a standalone treat, but it also pairs wonderfully alongside a cup of jasmine tea or iced green tea, cutting through the sweetness with light, fragrant notes. If you want to elevate the experience, serve it with a fresh fruit salad or a scoop of coconut sorbet for an indulgent summer dessert spread.
Creative Ways to Present
You can take your Mango Mochi display up a notch by serving them in individual clear glass bowls or delicate paper cupcake liners. For parties, arrange them on a tropical-themed platter with edible flowers and fresh mango slices. Another fun idea is to skewer mini Mango Mochi balls on decorative picks for an easy-to-eat finger food style presentation—perfect for gatherings and celebrations!
Make Ahead and Storage
Storing Leftovers
Mango Mochi is best enjoyed fresh but will keep well when stored in an airtight container in the refrigerator for up to 2 days. Be sure to separate each mochi with parchment paper to prevent sticking. When chilled, the mochi softens beautifully but can lose some of the original chewiness if kept too long.
Freezing
You can freeze Mango Mochi for longer storage. Place each mochi in a single layer on a baking tray and freeze until solid before transferring them to a freezer-safe container or zip-lock bag. Frozen Mango Mochi will last up to 1 month. Thaw in the refrigerator before serving, though the texture may become slightly softer upon thawing.
Reheating
To bring your Mango Mochi back to life after refrigeration or freezing, gently warm them in the microwave for 10 to 15 seconds on medium power. This will soften the mochi slightly without melting the whipped cream filling. Avoid overheating to maintain that perfect balance between chewy and creamy.
FAQs
What is the texture of Mango Mochi like?
Mango Mochi features a unique combination of chewy mochi dough and a soft, creamy center with fresh mango pieces, creating a delightful texture contrast that melts in your mouth.
Can I use frozen mango for this recipe?
Fresh mango is recommended because of its firm texture and vibrant flavor. However, if using frozen mango, be sure to thaw and drain it well to avoid excess moisture affecting the mochi filling.
Is yellow food coloring necessary?
The yellow food coloring is optional but adds a lovely mango-inspired hue to the mochi dough, making the dessert even more visually inviting.
Can I make Mango Mochi without a microwave?
If you don’t have a microwave, you can steam the mochi dough mixture in a heatproof bowl for about 15-20 minutes, stirring occasionally until translucent and cooked through.
How long does Mango Mochi last once made?
For the best taste and texture, enjoy Mango Mochi within 1 to 2 days of making it. Keep them refrigerated in an airtight container to maintain freshness.
Final Thoughts
Mango Mochi is one of those magical desserts that feel special but are surprisingly simple to make at home. The delightful chewy dough paired with sweet mango and light whipped cream makes every bite a little celebration of texture and flavor. If you’re ready to elevate your dessert game, give this recipe a try—your taste buds will thank you, and you might just find a new favorite treat to share with friends and family.
PrintMango Mochi Recipe
This Mango Mochi recipe features soft, chewy glutinous rice cake filled with fresh mango pieces and whipped cream, offering a perfect balance of sweetness and creaminess. A delightful Japanese-inspired dessert that’s easy to prepare and perfect for any occasion.
- Prep Time: 15 minutes
- Cook Time: 6-8 minutes (microwaving)
- Total Time: 25 minutes
- Yield: 6 mochi pieces 1x
- Category: Dessert
- Method: Microwaving and assembling
- Cuisine: Japanese-inspired
- Diet: Vegetarian
Ingredients
Mochi Dough
- 200g Glutinous rice flour (1 ½ cup)
- 65g Granulated sugar (⅓ cup)
- 40g Corn starch (⅓ cup)
- 360ml Whole milk (1 ½ cup)
- One small drop of yellow food coloring
- 1 ½ tbsp Vegetable oil
Whipped Cream Filling
- 350g Thickened cream (1 1/2 cup)
- 40g Granulated sugar (3 tbsp)
Additional Ingredients
- 2 large mangoes, cut into cubes
- Cornstarch, for dusting
Instructions
- Combine Dry Ingredients: In a medium-sized microwave-safe bowl, whisk together the glutinous rice flour, sugar, and cornstarch until well combined.
- Add Wet Ingredients: Pour in the whole milk and add a small drop of yellow food coloring, then whisk the mixture until smooth and uniform in color.
- First Microwave: Cover the bowl with cling wrap and microwave on high for 2 minutes.
- Stir and Continue Cooking: Remove the cling wrap, stir the mochi mixture, then cover again and microwave for another 2 minutes. The mochi dough should start to look semi-translucent.
- Check for Doneness: If the dough is still a bit liquidy or milky, continue microwaving in 1-minute intervals until cooked through.
- Cool the Mochi Dough: Allow the mochi to cool just enough so it can be handled safely.
- Knead the Dough: Add the vegetable oil, then knead the mochi dough with gloved or oiled hands until smooth and pliable.
- Prepare Baking Tray: Line a baking tray with baking paper and divide the mochi dough into six equal portions, placing them on the tray.
- Prepare Whipped Cream: In a separate bowl, whisk together the thickened cream and sugar until stiff peaks form.
- Chill Whipped Cream: Transfer the whipped cream into a piping bag fitted with a medium-sized round tip and refrigerate until ready to use.
- Dust Workspace: Sprinkle cornstarch over your work surface to prevent sticking.
- Shape Mochi: Take one portion of mochi and roll it into a ball. Dust it with cornstarch and roll it out into a thin circle on the work surface.
- Fill Mochi: Place the mochi circle inside a small bowl or saucer. Pipe a swirl of whipped cream onto the center.
- Add Mango: Top the whipped cream with a cube of fresh mango.
- Enclose Filling: Gather the edges of the mochi circle to enclose the filling, pinching it together at the top.
- Finish Mochi: Use scissors to snip off the twisted end, and dust the mochi with more cornstarch to reduce stickiness.
- Unmold Mochi: Turn the bowl over to reveal the neat, round mango mochi.
- Repeat: Repeat the shaping, filling, and finishing steps with the remaining mochi portions and filling ingredients until all are assembled.
Notes
- Keep your hands lightly oiled or dusted with cornstarch when handling the mochi to prevent sticking.
- Mangoes should be ripe but firm to maintain their shape inside the mochi.
- If microwaving times vary, check the mochi dough frequently until it turns semi-translucent and no longer liquidy.
- You can substitute yellow food coloring with natural options like turmeric, but use sparingly to avoid flavor interference.
- Store finished mochi in an airtight container in the refrigerator and consume within 2 days for best freshness.
Nutrition
- Serving Size: 1 mochi (approx. 90g)
- Calories: 210 kcal
- Sugar: 18g
- Sodium: 10mg
- Fat: 9g
- Saturated Fat: 5.5g
- Unsaturated Fat: 3g
- Trans Fat: 0g
- Carbohydrates: 28g
- Fiber: 1g
- Protein: 3g
- Cholesterol: 40mg
Keywords: mango mochi, mochi dessert, glutinous rice mochi, mango dessert, Japanese mochi, whipped cream mochi


