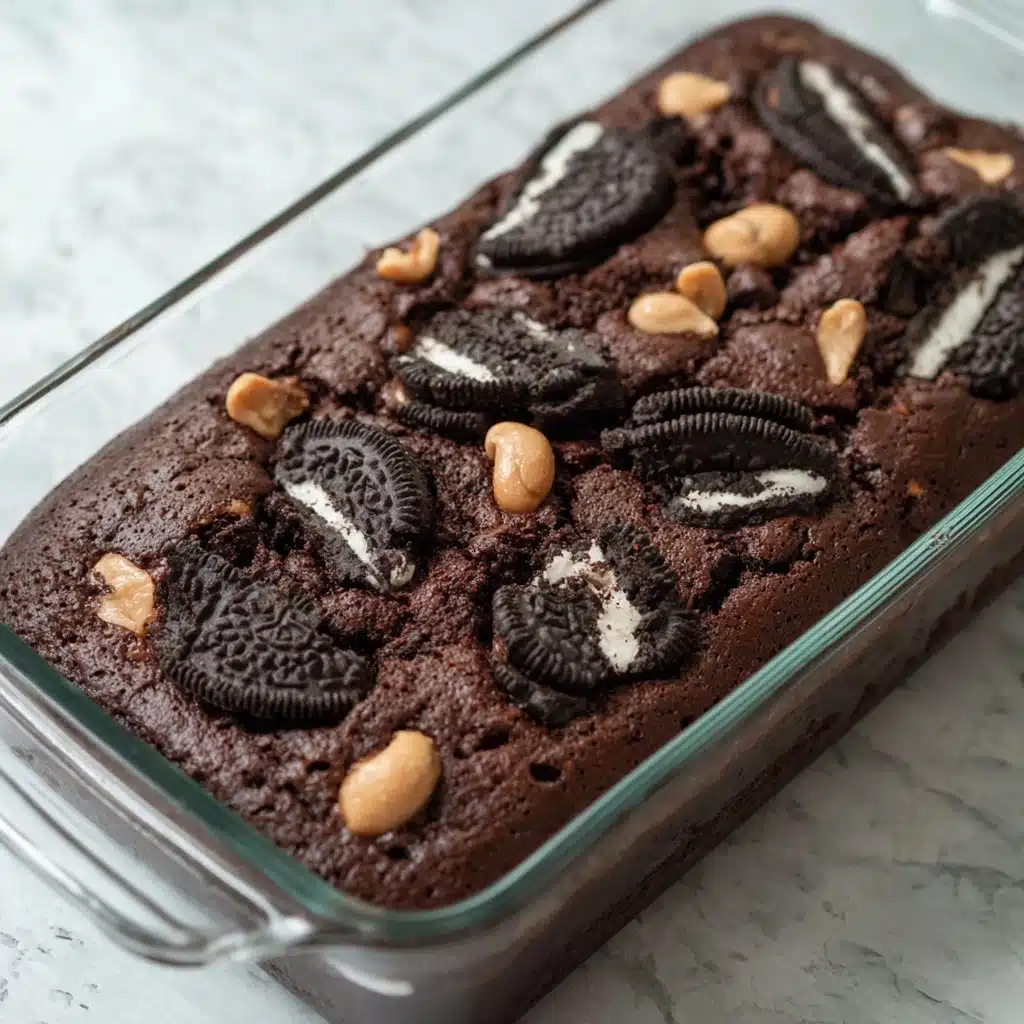
Oreo Dump Cake Recipe
If you adore chocolatey treats with a nostalgic twist, then you are absolutely going to fall head over heels for this easy-to-make Oreo Dump Cake. This delightful dessert layers the rich crunch of Oreo cookies with luscious sweetened condensed milk, fluffy Cool Whip, and a crumbly chocolate cake topping finished with buttery goodness. The magic of the Oreo Dump Cake lies in its simplicity and the incredible harmony of textures and flavors that come together in one pan. It’s a perfect showstopper for family dinners, casual get-togethers, or any time you crave a cozy, comforting dessert.

Ingredients You’ll Need
Every ingredient in this recipe plays a starring role, keeping things simple while building layers of flavor and texture that make this Oreo Dump Cake unforgettable. You won’t need anything fancy—just a handful of pantry staples that bring richness, creaminess, and a touch of crunch to every bite.
- Oreo cookies (20): Two layers of Oreos add that iconic chocolate sandwich cookie crunch and creaminess beneath the topping.
- Sweetened condensed milk (14 ounces): This thick, sweet milk merges the cookie layer and Cool Whip, adding velvety moisture and sweetness.
- Cool Whip (8 ounces, thawed): Light and fluffy, it creates a cloud-like layer that perfectly balances the rich cake mix topping.
- Chocolate cake mix (1 box): Sprinkled on top, this forms the crumbly yet cakey crust that contrasts beautifully with the smooth layers underneath.
- Butter (¾ cup or 12 tablespoons, sliced): Dotting the top, butter melts during baking, infusing the cake mix with moistness and a golden, irresistible finish.
How to Make Oreo Dump Cake
Step 1: Prep Your Baking Dish
Start by preheating your oven to 350°F (175°C)—this step ensures your cake will bake evenly and develop a golden crust. Lightly grease a 9×13-inch baking dish with butter or non-stick spray, which helps prevent sticking and gives the edges a lovely finish. Trust me, this simple step makes cleanup easier and presentation prettier.
Step 2: Layer the Oreo Cookies
Next, arrange two layers of 10 Oreo cookies each across the bottom of your baking dish. Don’t crush or crumble them; just lay them out to form a solid base. This layer provides a delightful crunchy texture that contrasts perfectly with the creamy layers to come.
Step 3: Pour the Sweetened Condensed Milk
Now, evenly pour the entire 14 ounces of sweetened condensed milk over the Oreos. This luscious liquid acts like glue that binds the layers while adding rich sweetness and a creamy mouthfeel. It’s one of the secret ingredients that makes this Oreo Dump Cake so decadently moist.
Step 4: Spread the Cool Whip
Use a spatula to gently spread the Cool Whip over the sweetened condensed milk layer. This fluffy topping adds lightness and a touch of chill that counterbalances the dense cake mix later. Make sure it’s spread evenly but don’t worry about perfection—this is a rustic, easy dessert!
Step 5: Sprinkle the Chocolate Cake Mix
Sprinkle the entire box of dry chocolate cake mix over the Cool Whip in an even layer. Use a fork to break up any lumps and rake it out so it covers the surface nicely. This dry topping will bake into a crumbly, chocolaty crust that’s essential for that satisfying texture contrast.
Step 6: Add the Butter
Finally, cut your butter into small pats—about 1 tablespoon each—and distribute them evenly across the surface of the cake mix. Do not stir or mix anything together. The butter will melt during baking, creating pockets of rich moisture and helping the cake crust brown to perfection.
Step 7: Bake and Cool
Pop your dish into the preheated oven and bake for 40 to 45 minutes. You’ll know it’s done when the edges are bubbling and the top is golden brown. Remove the cake from the oven and let it cool slightly before serving to let the layers set and flavors meld. Your Oreo Dump Cake is now ready to wow your taste buds!
How to Serve Oreo Dump Cake
Garnishes
To take your Oreo Dump Cake to the next level, sprinkle crushed Oreo crumbs, a drizzle of chocolate syrup, or even a dollop of extra Cool Whip on top. Fresh berries like raspberries or strawberries also add a bright, tart contrast that complements the rich, chocolatey layers delightfully.
Side Dishes
This dessert pairs beautifully with a scoop of vanilla ice cream or homemade whipped cream. For a fun twist, consider serving alongside a glass of cold milk or a hot cup of coffee to balance the sweetness and provide a comforting finish to your meal.
Creative Ways to Present
For a party, portion the Oreo Dump Cake into individual clear cups or mason jars for an irresistible layered look. You can also add a sprig of mint on top for a pop of color, or serve warm with a spoonful of caramel sauce drizzled over each serving to impress your guests visually and taste-wise.
Make Ahead and Storage
Storing Leftovers
Once cooled, cover the Oreo Dump Cake tightly with plastic wrap or transfer leftovers to an airtight container. Store in the refrigerator for up to 4 days. The flavors actually deepen with time, making it even tastier on day two or three!
Freezing
If you want to save your Oreo Dump Cake for later, wrap it tightly in foil and place it in the freezer. It can keep well for up to 2 months. Thaw overnight in the refrigerator before reheating or serving chilled according to your preference.
Reheating
To reheat, place a slice on a microwave-safe plate and warm for 20-30 seconds until just heated through. You can also reheat individual portions in the oven at 325°F (165°C) for about 10-15 minutes to bring back that fresh-baked crispness on top.
FAQs
Can I use other cookie flavors instead of Oreos?
Absolutely! While classic Oreo cookies give this dump cake its signature flavor, you can experiment with other sandwich cookies or even chocolate chip cookies for a different twist. Just keep the quantity similar to maintain balance.
Is it necessary to thaw the Cool Whip before using?
Yes, thawing the Cool Whip for about 15 minutes at room temperature helps it spread more easily and blend well with the other layers, ensuring smooth, even coverage throughout your dessert.
Can I prepare this dessert in advance?
Definitely! You can assemble the Oreo Dump Cake the night before and refrigerate it without baking. Just add baking time right before serving or bake it fresh to enjoy warm, gooey layers.
What if I don’t have a 9×13 pan?
If you don’t have a 9×13 baking dish, another oven-safe dish of similar size will work. The key is to have an even layer so the cake cooks consistently. Just watch the baking time to avoid over or undercooking.
Can I make this dessert gluten-free?
To make a gluten-free Oreo Dump Cake, use gluten-free sandwich cookies and a gluten-free chocolate cake mix. The rest of the ingredients are naturally gluten-free, making this dessert adaptable to special dietary needs.
Final Thoughts
This Oreo Dump Cake is hands down one of my favorite quick desserts to whip up when I want something indulgent without a complicated process. Its irresistible layers, ease of assembly, and crowd-pleasing flavors make it a guaranteed hit every single time. I can’t wait for you to try this recipe and create your own happy moments around a warm slice (or two) of Oreo Dump Cake!
PrintOreo Dump Cake Recipe

Oreo Dump Cake is a simple, no-fuss dessert that layers crunchy Oreo cookies with sweetened condensed milk, fluffy Cool Whip, chocolate cake mix, and butter to create a rich and indulgent treat perfect for any occasion.
- Prep Time: 10 minutes
- Cook Time: 40-45 minutes
- Total Time: 50-55 minutes
- Yield: 12 servings 1x
- Category: Dessert
- Method: Baking
- Cuisine: American
- Diet: Vegetarian
Ingredients
Oreo Layer
- 20 Oreo cookies
Wet Ingredients
- 14 ounces sweetened condensed milk (1 14-ounce can)
- 1 8-ounce container Cool Whip, thawed for about 15 minutes
Dry Ingredients
- 1 box chocolate cake mix (typically about 15.25 ounces)
Butter
- ¾ cup (1 ½ sticks or 12 tablespoons) butter, cut into 12 pats or smaller pieces
Instructions
- Preheat Oven: Preheat your oven to 350°F (175°C) and lightly grease a 9×13 inch baking dish with butter or non-stick spray to prevent sticking.
- Layer Oreos: Arrange two layers of 10 Oreo cookies each evenly across the bottom of the prepared baking dish to form the base.
- Add Sweetened Condensed Milk: Pour the entire 14 ounces of sweetened condensed milk evenly over the Oreo cookies to moisten them and add richness.
- Spread Cool Whip: Gently spread the thawed 8 ounces of Cool Whip evenly over the condensed milk layer, using a spatula to create a smooth top layer.
- Sprinkle Cake Mix: Evenly sprinkle one box of chocolate cake mix over the Cool Whip layer. Use a fork to break up any clumps and ensure an even distribution.
- Add Butter: Cut the ¾ cup of butter into 1 tablespoon slices or smaller and scatter them evenly over the cake mix layer, covering as much surface as possible without mixing the layers.
- Bake: Place the baking dish in the preheated oven and bake for 40-45 minutes, until the top is golden brown and bubbly.
- Cool and Serve: Remove the cake from the oven and allow it to cool slightly before serving to let the layers set for easier slicing and handling.
Notes
- Make sure to thaw the Cool Whip before assembling to ensure easy spreading.
- Do not mix the layers; just layer and bake as is for the best texture.
- This cake is rich and sweet, so small serving sizes are recommended.
- You can add chopped nuts or chocolate chips on top of the cake mix layer for added texture if desired.
- Store leftovers covered in the refrigerator for up to 3 days.
Nutrition
- Serving Size: 1 slice (1/12th of cake)
- Calories: 350
- Sugar: 35g
- Sodium: 250mg
- Fat: 18g
- Saturated Fat: 11g
- Unsaturated Fat: 6g
- Trans Fat: 0.5g
- Carbohydrates: 45g
- Fiber: 2g
- Protein: 3g
- Cholesterol: 45mg
Keywords: Oreo cake, dump cake, easy dessert, no bake cake mix dessert, chocolate cake, Oreo dessert


