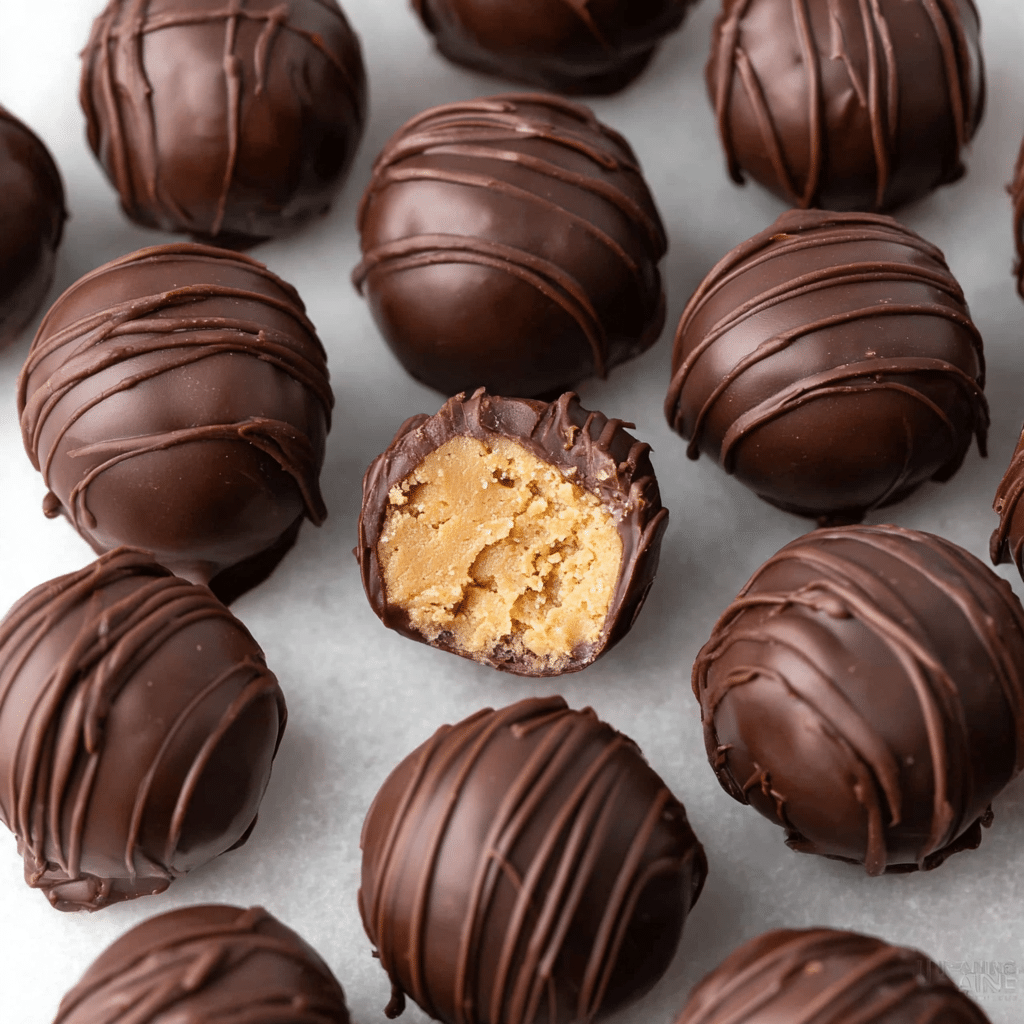
Peanut Butter Balls with Rice Krispies Recipe
If you’re looking for a sweet treat that’s as irresistibly crunchy as it is creamy, you’ve just found your new favorite snack: Peanut Butter Balls with Rice Krispies. This delightful combination of smooth peanut butter, crispy Rice Krispies cereal, and a rich chocolate coating creates a heavenly balance of textures and flavors that will have you reaching for seconds in no time. Perfectly sweet, satisfyingly crunchy, and incredibly easy to make, these peanut butter balls are sure to become a beloved addition to your dessert lineup.
Ingredients You’ll Need
This recipe uses simple but essential ingredients that come together beautifully to create a perfect bite every time. Each item plays an important role—from the butter that adds creaminess, to the vanilla that brings warmth, and of course the Rice Krispies that give that signature crisp texture.
- Unsalted butter (½ cup, room temperature): Provides a smooth, rich base that blends perfectly with peanut butter.
- Creamy peanut butter (1 jar, 16oz/454g): The star of the show, bringing that classic nutty flavor and creamy texture.
- Powdered sugar (3 ½ cups, sifted): Sweetens the mixture evenly without adding graininess for a smooth finish.
- Vanilla extract (1 teaspoon, pure): Enhances the flavor depth with a subtle, aromatic sweetness.
- Rice Krispies cereal (2 cups): Adds irresistible crunch and lightness inside each ball.
- Ghirardelli dark chocolate melting wafers (15 ounces): Creates a decadent, glossy coating that complements the peanut butter perfectly.
How to Make Peanut Butter Balls with Rice Krispies
Step 1: Prepare Your Base Mixture
Start by lining a baking sheet with parchment paper to keep things neat and make cleanup a breeze. In a medium-sized mixing bowl, beat together the unsalted butter and creamy peanut butter until the mixture is completely smooth—no lumps here! This creamy foundation is what makes these balls melt in your mouth.
Step 2: Sweeten and Add Crunch
Next up, add the sifted powdered sugar along with the vanilla extract to your creamy peanut butter mixture. Beat everything until it’s well combined, then gently fold in the Rice Krispies cereal. This step brings a satisfying crunch and a light texture, turning the mixture into the perfect peanut butter ball dough.
Step 3: Chill and Shape
Use a small cookie scoop to portion the mixture onto the prepared baking sheet. Pop the tray in the refrigerator for 30 minutes or the freezer for 15 minutes to let them firm up a bit—this makes rolling them so much easier! When chilled, roll each scoop between your hands to form neat, smooth balls. Give them another quick chill in the freezer for about 10 minutes so they’re ready for dipping.
Step 4: Melt and Dip the Chocolate
Work in small batches when melting your chocolate wafers—6 balls at a time is perfect. Melt the chocolate in a microwave-safe bowl at half power in 30-second bursts, stirring in between to avoid scorching. Once the chocolate is silky smooth, use a spoon to fully coat each peanut butter ball. Lift it out with a fork, tapping off any excess chocolate before placing it back on the parchment-lined sheet. Let the chocolate set completely at room temperature or in the fridge.
Step 5: Optional Chocolate Drizzle
If you want to get fancy, wait until the chocolate coating is fully set, then drizzle more melted chocolate over the top for an extra elegant touch. This adds a beautiful finishing look and even more chocolate goodness!
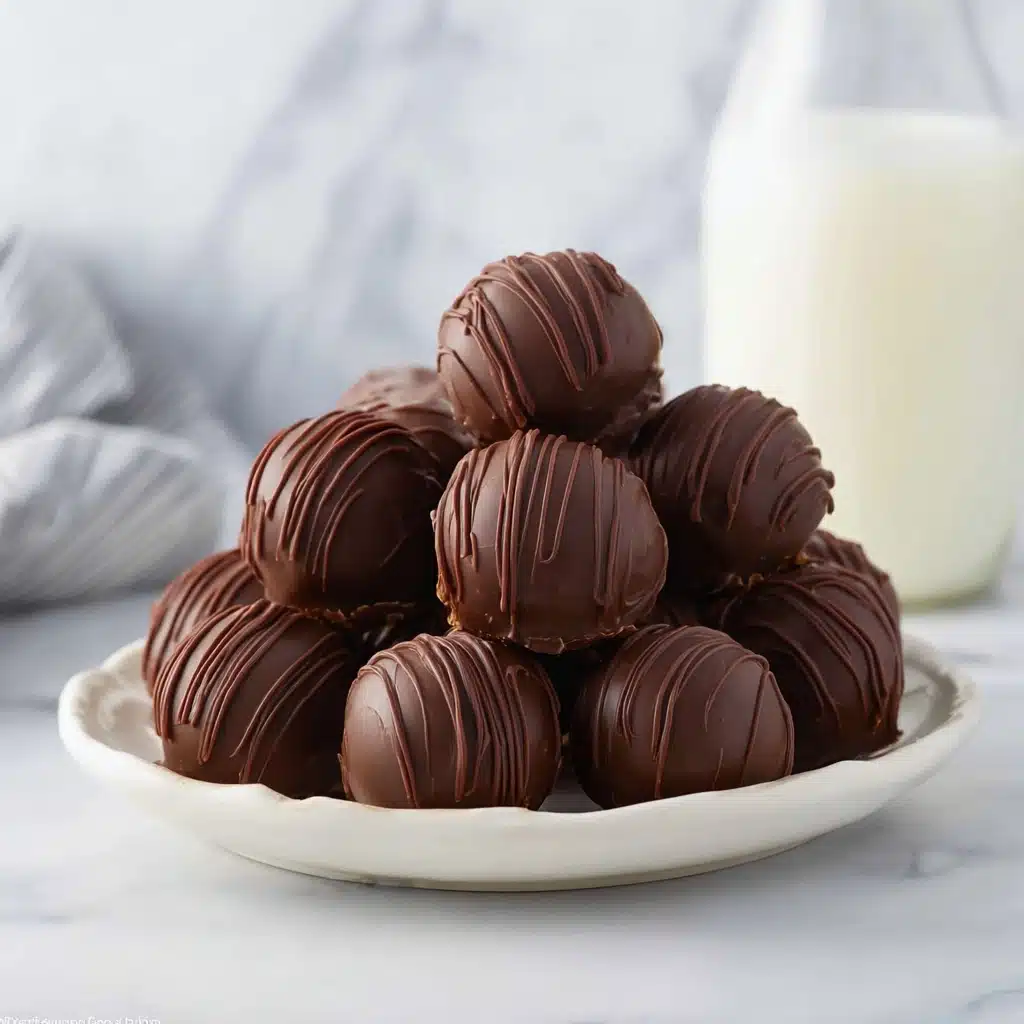
How to Serve Peanut Butter Balls with Rice Krispies
Garnishes
To make your Peanut Butter Balls with Rice Krispies really pop, consider garnishing with a sprinkle of crushed peanuts or a light dusting of cocoa powder. These additions bring extra texture and flavor contrast, elevating the presentation for your next gathering.
Side Dishes
These peanut butter treats pair wonderfully with a cold glass of milk, a cup of robust coffee, or even a scoop of vanilla ice cream for a full dessert experience. Their sweetness balances perfectly against creamy or slightly bitter side options.
Creative Ways to Present
For gifting, wrap your Peanut Butter Balls with Rice Krispies individually in colorful cellophane tied with ribbon—instant homemade treats that wow. You can also arrange them on a decorative platter with fresh berries or edible flowers for a charming party display.
Make Ahead and Storage
Storing Leftovers
Peanut Butter Balls with Rice Krispies keep beautifully in an airtight container in the refrigerator for up to one week. Cooling them helps maintain their structure and keeps the chocolate coating firm and glossy.
Freezing
If you want to make these ahead of time, freeze the uncoated peanut butter balls before dipping in chocolate, or freeze the fully coated ones after they have set. Be sure to separate layers with parchment paper to keep them from sticking, and store in a sealed container for up to three months.
Reheating
There’s no need to reheat these delicious bites; however, if you prefer slightly softer chocolate, let them sit at room temperature for 10-15 minutes before serving. Avoid microwaving as it can melt the chocolate unevenly and affect the texture.
FAQs
Can I use crunchy peanut butter instead of creamy?
Absolutely! Using crunchy peanut butter will add a little extra texture inside your Peanut Butter Balls with Rice Krispies, which some people really enjoy for an extra nutty crunch.
Is it necessary to use Ghirardelli dark chocolate wafers?
While you can use any good-quality melting chocolate, Ghirardelli wafers melt smoothly and have a rich flavor that complements the peanut butter beautifully. Choose dark, milk, or semi-sweet based on your preference.
Can these be made nut-free?
To make a nut-free version, substitute the peanut butter with a sunflower seed butter or soy nut butter. You’ll get a similar creamy texture with a different but just as delicious flavor.
How do I prevent the chocolate coating from cracking?
Make sure your Peanut Butter Balls with Rice Krispies are well chilled before dipping, and let the chocolate set at room temperature or in a cool, dry place to avoid cracking caused by sudden temperature changes.
Can I add other mix-ins to the balls?
Yes! Feel free to mix in mini chocolate chips, chopped nuts, or even dried fruit to add new flavor notes and textures to your peanut butter balls.
Final Thoughts
Once you try these Peanut Butter Balls with Rice Krispies, you’ll wonder how you ever lived without them! They’re the perfect blend of creamy, crunchy, and chocolatey, with simple ingredients and easy steps that anyone can master. Share them with friends or keep them all to yourself—you deserve it. Happy snacking!
PrintPeanut Butter Balls with Rice Krispies Recipe

These Peanut Butter Balls with Rice Krispies are a delightful no-bake treat combining creamy peanut butter, crispy cereal, and a rich chocolate coating. Perfect for snack time or parties, they offer a sweet, crunchy, and chocolaty bite-sized dessert that’s easy to make and sure to satisfy your sweet tooth.
- Prep Time: 15 minutes
- Cook Time: 0 minutes
- Total Time: 1 hour
- Yield: Approximately 24 peanut butter balls 1x
- Category: Dessert
- Method: No-bake, Dipping
- Cuisine: American
- Diet: Vegetarian
Ingredients
Peanut Butter Balls
- ½ cup unsalted butter, at room temperature
- 1 jar (16oz/454g) creamy peanut butter
- 3 ½ cups powdered sugar, sifted
- 1 teaspoon pure vanilla extract
- 2 cups Rice Krispies cereal
Chocolate Coating
- 15 ounces Ghirardelli dark chocolate melting wafers
Instructions
- Prepare the Baking Sheet: Line a baking sheet with parchment paper to prevent sticking and make cleanup easier.
- Mix Butter and Peanut Butter: In a medium mixing bowl, beat the room temperature butter and creamy peanut butter until the mixture is completely smooth and lump-free.
- Add Powdered Sugar and Vanilla: Gradually add the sifted powdered sugar and vanilla extract, beating until fully combined; then gently fold in the Rice Krispies cereal to maintain its crunch.
- Form Peanut Butter Balls: Using a small cookie scoop, place scoops of the mixture onto the prepared baking sheet. Refrigerate for 30 minutes or freeze for 15 minutes to firm up.
- Shape the Balls: Remove from the fridge and roll each scoop between your hands to create smooth balls. For easier dipping, freeze the balls for an additional 10 minutes to harden.
- Melt the Chocolate: In a microwave-safe bowl, melt the Ghirardelli dark chocolate wafers at 50% power in 30-second intervals, stirring after each to prevent burning until smooth.
- Dip the Peanut Butter Balls: In small batches (about six at a time), dip each ball fully into the melted chocolate coating. Use a fork to lift them out and tap off any excess chocolate by gently tapping the fork against the bowl’s edge.
- Set the Coating: Place the dipped balls back onto the parchment-lined baking sheet and let the chocolate coating set completely at room temperature or in the refrigerator.
- Optional Chocolate Drizzle: After the chocolate coating has set, you can drizzle additional melted chocolate over the balls for a decorative finish.
Notes
- For easier handling, keep the peanut butter balls refrigerated until ready to dip.
- If you prefer a different type of chocolate, semi-sweet or milk chocolate wafers can be substituted.
- Ensure the powdered sugar is sifted to avoid lumps in the mixture.
- Store the finished peanut butter balls in an airtight container in the refrigerator for up to one week.
- Freezing the balls before dipping makes the coating process cleaner and easier.
Nutrition
- Serving Size: 1 ball (approx. 25g)
- Calories: 160
- Sugar: 15g
- Sodium: 55mg
- Fat: 10g
- Saturated Fat: 4g
- Unsaturated Fat: 5g
- Trans Fat: 0g
- Carbohydrates: 15g
- Fiber: 1g
- Protein: 4g
- Cholesterol: 15mg
Keywords: peanut butter balls, no-bake dessert, Rice Krispies treats, chocolate coated snacks, easy party desserts

